<?xml version="1.0" encoding="utf-8"?><feed xmlns="http://www.w3.org/2005/Atom" ><generator uri="https://jekyllrb.com/" version="4.4.1">Jekyll</generator><link href="https://abhijeetk.github.io/feed.xml" rel="self" type="application/atom+xml" /><link href="https://abhijeetk.github.io/" rel="alternate" type="text/html" /><updated>2025-03-05T14:39:26+05:30</updated><id>https://abhijeetk.github.io/feed.xml</id><title type="html">Abhijeet Kandalkar</title><subtitle>Software Engineer @ Igalia | C++ developer | Open Source contributor in Webkit/Chromium</subtitle><entry><title type="html">Testing WebXR on Windows</title><link href="https://abhijeetk.github.io/Testing-WebXR-on-Windows/" rel="alternate" type="text/html" title="Testing WebXR on Windows" /><published>2025-03-05T00:00:00+05:30</published><updated>2025-03-05T00:00:00+05:30</updated><id>https://abhijeetk.github.io/Testing-WebXR-on-Windows</id><content type="html" xml:base="https://abhijeetk.github.io/Testing-WebXR-on-Windows/"><![CDATA[<h3 id="webxr-on-windows">WebXR on Windows</h3>

<p>It started with my need to debug Chromium’s implementation of OpenXR. I wanted to understand how Chromium interfaces with OpenXR APIs. However, I noticed that only the Android and Windows ports of Chromium currently support OpenXR bindings. Since I needed to debug a desktop implementation, Windows was the only viable option. Additionally, I did not have access to a physical XR device, so I explored whether a simulator or emulator environment could be used to test WebXR support for websites.</p>

<h3 id="understanding-webxr-and-openxr">Understanding WebXR and OpenXR</h3>

<p>Before diving into implementation details, it’s useful to understand what WebXR and OpenXR are and how they differ.</p>

<p>WebXR is a web standard that enables immersive experiences, such as Virtual Reality (VR) and Augmented Reality (AR),
in web browsers. It allows developers to create XR content using JavaScript and run it directly in a browser
without requiring platform-specific applications.</p>

<p>OpenXR is a cross-platform API standard developed by the Khronos Group, designed to unify access to different
XR hardware and software. It provides a common interface for VR and AR devices, ensuring interoperability across
different platforms and vendors.</p>

<p>The key difference is that WebXR is a high-level API used by web applications to access XR experiences, whereas
OpenXR is a low-level API used by platforms and engines to communicate with XR hardware. WebXR implementations,
such as the one in Chromium use OpenXR as the backend to interact with different XR runtimes.</p>

<h3 id="chromium-openxr-implementation">Chromium OpenXR Implementation</h3>
<p>Chromium’s OpenXR implementation, which interacts with the platform-specific OpenXR runtime, is located in the <code class="language-plaintext highlighter-rouge">device/vr/</code> directory. WebXR code interacts with this <code class="language-plaintext highlighter-rouge">device/vr/</code> OpenXR implementation, which abstracts WebXR features across multiple platforms.</p>

<div class="language-plaintext highlighter-rouge"><div class="highlight"><pre class="highlight"><code>WebXR ---&gt; device/vr/ ---&gt; OpenXR API ---&gt; OpenXR runtime
</code></pre></div></div>

<h3 id="installing-openxr-runtime">Installing OpenXR Runtime</h3>
<p>To run OpenXR on Windows, you need to install an OpenXR runtime. You can download and install <strong>OpenXR Tools for Windows Mixed Reality</strong> from the Microsoft App Store:</p>

<p><a href="https://apps.microsoft.com/store/detail/openxr-tools-for-windows-mixed-reality/9N5CVVL23QBT"><img src="https://store-images.s-microsoft.com/image/apps.49732.14036023774986754.8b104295-c4f4-48ad-b4c1-925b8e216e67.9002afb2-b23d-4d2f-b55f-7fe68687f8d5?h=720" alt="OpenXR Tools for Windows Mixed Reality" /></a></p>

<p>If it is not available on your machine, you can enable it from the <strong>OpenXR Runtime</strong> tab in the application.</p>

<h3 id="installing-microsoft-mixed-reality-simulator">Installing Microsoft Mixed Reality Simulator</h3>
<p>To set up a simulated environment for WebXR testing, follow these steps:</p>

<ol>
  <li>Install <strong>Mixed Reality Portal</strong> from the Microsoft App Store.</li>
  <li>Follow the official Microsoft guide on enabling the Mixed Reality simulator:
<a href="https://learn.microsoft.com/en-us/windows/mixed-reality/develop/advanced-concepts/using-the-windows-mixed-reality-simulator#enabling-the-windows-mixed-reality-simulator">Using the Windows Mixed Reality Simulator</a></li>
</ol>

<p>If you encounter hardware compatibility errors, refer to the troubleshooting steps in the guide below.</p>

<p>https://www.thewindowsclub.com/disable-hardware-requirement-checks-for-mixed-reality-portal</p>

<h3 id="connecting-chromium-to-openxr-implementation">Connecting Chromium to OpenXR Implementation</h3>
<p>Chromium provides a flag to select the OpenXR implementation.</p>

<ol>
  <li>Open Chrome and navigate to:
    <div class="language-plaintext highlighter-rouge"><div class="highlight"><pre class="highlight"><code>chrome://flags/#webxr-runtime
</code></pre></div>    </div>
  </li>
  <li>Set the flag to <code class="language-plaintext highlighter-rouge">OpenXR</code>.</li>
</ol>

<p>This enables Chromium to use the OpenXR runtime for WebXR applications.</p>

<h3 id="launch-webvr-application">Launch WebVR application</h3>
<p>Launch chromium and Open : https://immersive-web.github.io/webxr-samples/immersive-vr-session.html</p>

<p><img src="/images/WebXR-on-Windows/output.jpg" alt="output" title="Testing WebXR on Windows" /></p>

<h3 id="callstack">CallStack</h3>
<p>When we call <code class="language-plaintext highlighter-rouge">navigator.xr.requestSession("immersive-vr");</code> from Javascript, below call stack get triggered.</p>

<p><img src="/images/WebXR-on-Windows/callstack.png" alt="callstack" title="Testing WebXR on Windows" /></p>

<h3 id="conclusions">Conclusions</h3>
<p>With this setup, you can explore and debug WebXR applications on Windows even without a physical VR headset.
The combination of Chromium’s OpenXR implementation and Microsoft’s Mixed Reality Simulator provides
a practical way to test WebXR features and interactions.</p>

<p>If you’re interested in further experimenting, try developing a simple WebXR scene to validate your
setup! Additionally, we plan to post more about Chromium’s architecture on OpenXR and will link
those posts here once they are ready.</p>]]></content><author><name></name></author><summary type="html"><![CDATA[WebXR on Windows]]></summary></entry><entry><title type="html">Exploring sandboxing in CEF and CEFSharp for Windows platform</title><link href="https://abhijeetk.github.io/Exploring-sandboxing-in-CEF-and-CEFSharp/" rel="alternate" type="text/html" title="Exploring sandboxing in CEF and CEFSharp for Windows platform" /><published>2024-08-11T00:00:00+05:30</published><updated>2024-08-11T00:00:00+05:30</updated><id>https://abhijeetk.github.io/Exploring-sandboxing-in-CEF-and-CEFSharp</id><content type="html" xml:base="https://abhijeetk.github.io/Exploring-sandboxing-in-CEF-and-CEFSharp/"><![CDATA[<p>Sandboxing is a critical feature for ensuring the security and stability of applications that embed web content. In this blog, we will delve into how sandboxing is achieved in the Chromium Embedded Framework (<a href="https://bitbucket.org/chromiumembedded/cef/src/master/">CEF</a>). All analysis in this blog is performed on Windows operating system.</p>

<h3 id="cefclient-and-cefsharp">CEFClient and CEFSharp</h3>
<p>The base CEF framework includes support for the C and C++ programming languages. Also it provides a test applications to demonstrate its functionality. <a href="https://bitbucket.org/chromiumembedded/cef/src/master/tests/cefclient/">CEFClient</a>, a one of the C++ test application, serves this purpose.</p>

<p>CEF provides CAPI bindings to enable application development across various programming languages. For integrating the CEF framework with .NET, you should explore <a href="https://github.com/cefsharp/CefSharp">CEFSharp</a>. It is a C# application that leverages the CEF open source project, allowing developers to create applications in C#.</p>

<div class="language-plaintext highlighter-rouge"><div class="highlight"><pre class="highlight"><code>CEFSharp(C#)
            \  CAPI 
              -------&gt; CEF(C++) ------&gt; Chromium(C++)
            /
CEFClient(C++)
</code></pre></div></div>
<hr />

<h3 id="what-is-the-sandbox">What is the sandbox?</h3>
<p>As mentioned in <a href="https://chromium.googlesource.com/chromium/src/+/HEAD/docs/design/sandbox_faq.md#what-is-the-sandbox">documentation</a> of sandbox in Chromium repository,</p>
<blockquote>
  <h2 id="the-sandbox-is-a-c-library-that-allows-the-creation-of-sandboxed-processes--processes-that-execute-within-a-very-restrictive-environment-the-only-resources-sandboxed-processes-can-freely-use-are-cpu-cycles-and-memory-for-example-sandboxes-processes-cannot-write-to-disk-or-display-their-own-windows-what-exactly-they-can-do-is-controlled-by-an-explicit-policy-chromium-renderers-are-sandboxed-processes">The sandbox is a C++ library that allows the creation of sandboxed processes — processes that execute within a very restrictive environment. The only resources sandboxed processes can freely use are CPU cycles and memory. For example, sandboxes processes cannot write to disk or display their own windows. What exactly they can do is controlled by an explicit policy. Chromium renderers are sandboxed processes.</h2>
</blockquote>

<h3 id="understanding-sandboxing-in-cef">Understanding Sandboxing in CEF</h3>

<p>Since CEF uses Chromium internally, we decided to investigate how sandboxing is implemented by examining Chromium’s source code. Our findings revealed that the sandbox is designed to be versatile, with no hard dependencies on the Chromium browser itself, making it usable with other applications.</p>

<p>CEF prepares a static <a href="https://bitbucket.org/chromiumembedded/cef/src/69b884d39cbcb6497187a65d1fac6782ef823040/BUILD.gn#lines-1181">library</a> using the existing <a href="https://source.chromium.org/chromium/chromium/src/+/main:sandbox/win/src/">sandbox</a> implementation in the Chromium repository and links it to the main application. This process enables the sandbox functionality in CEF applications. For more detailed information, refer to the <a href="https://bitbucket.org/chromiumembedded/cef/src/master/libcef_dll/sandbox/sandbox_win.cc">sandbox_win.cc</a> file in the CEF repository.</p>

<div class="language-plaintext highlighter-rouge"><div class="highlight"><pre class="highlight"><code>if (is_win) {
  static_library("cef_sandbox") {
    sources = [ "libcef_dll/sandbox/sandbox_win.cc" ]
    include_dirs = [ "." ]
    deps = [ "libcef/features", "//sandbox" ]
  }
}
</code></pre></div></div>

<hr />

<h3 id="implementing-sandboxing-in-cefclient">Implementing Sandboxing in CEFClient</h3>

<p>CEFClient achieves a sandboxing by linking to cef_sandbox library</p>
<div class="language-plaintext highlighter-rouge"><div class="highlight"><pre class="highlight"><code>  executable("cefclient") {
      deps += [
        ":cef_sandbox",
      ]
</code></pre></div></div>

<p>In the CEFClient application, we need to create a sandbox object and pass it to CEF, which then forwards it internally to Chromium to configure the sandbox.</p>
<div class="language-plaintext highlighter-rouge"><div class="highlight"><pre class="highlight"><code>  CefScopedSandboxInfo scoped_sandbox;
  sandbox_info = scoped_sandbox.sandbox_info();
  ...
  // Initialize the CEF browser process.
  if (!context-&gt;Initialize(main_args, settings, app, sandbox_info)) {
    return 1;
  }
</code></pre></div></div>

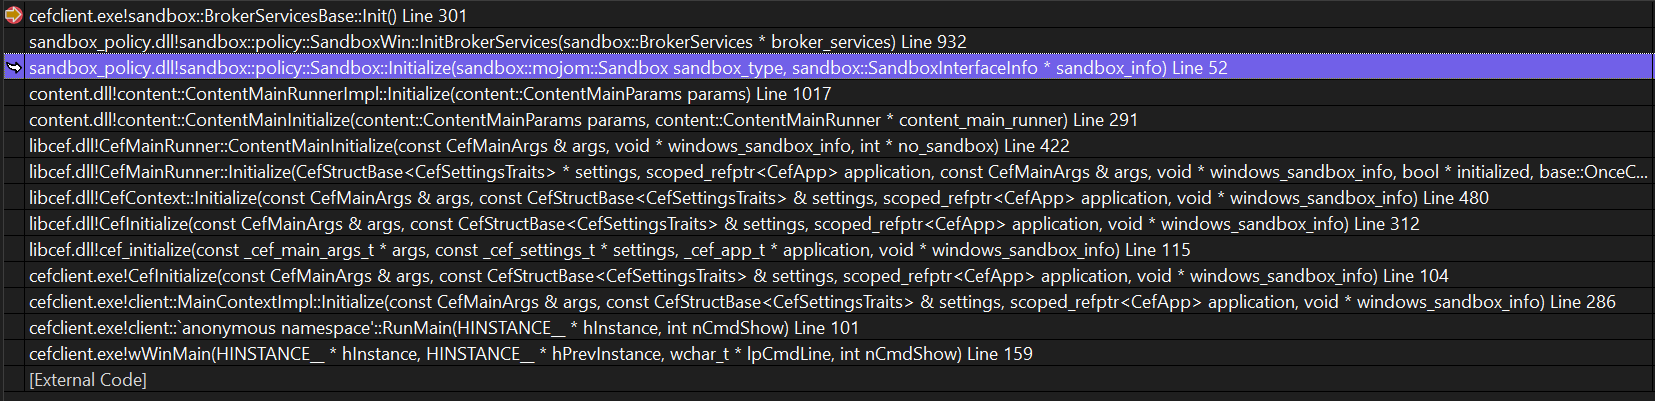
<p>The following call stack illustrates how CEFClient code calls into CEF, ultimately transitioning into the Chromium environment to configure the sandbox.</p>

<p><img src="/images/Exploring-sandboxing-in-CEF-and-CEFSharp/bd290d80-d51f-4772-8e24-dc57ee73ba47.png" alt="" /></p>

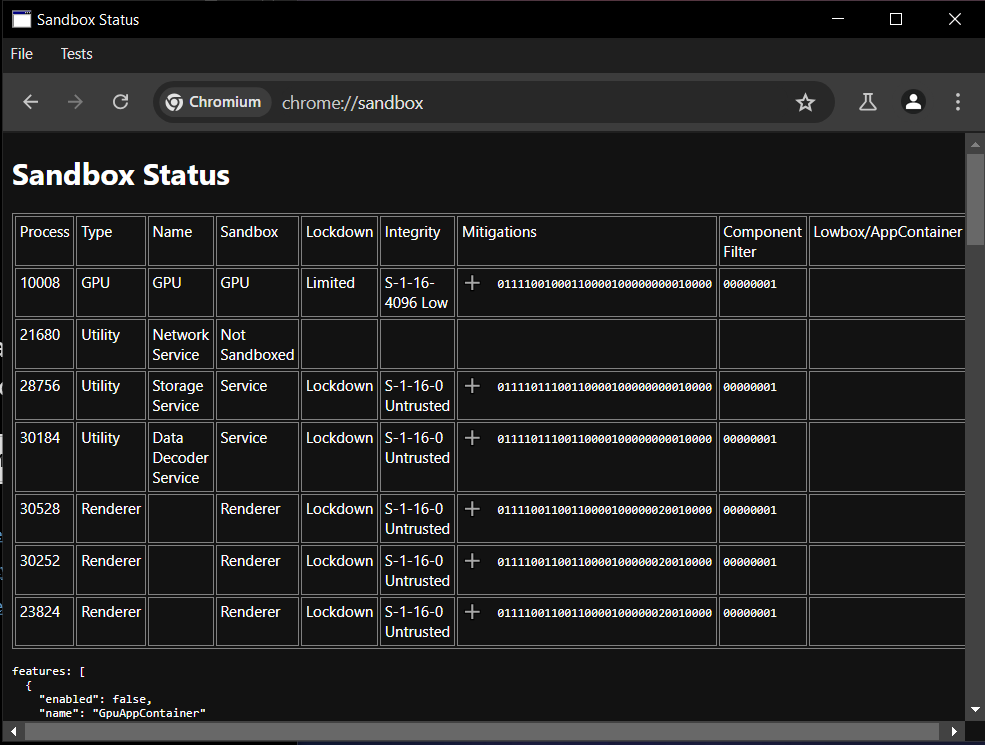
<p>The CEF test application (CEFClient) successfully launches a sandboxed CEF, which is verified by loading the <code class="language-plaintext highlighter-rouge">chrome://sandbox</code> URL.</p>

<p><img src="/images/Exploring-sandboxing-in-CEF-and-CEFSharp/cb0b3336-4af7-49b1-82ed-2e1abccc2e38.png" alt="" /></p>

<hr />

<h3 id="why-c-applications-cannot-use-sandboxed-cef-">Why C# Applications Cannot Use Sandboxed CEF ?</h3>

<p>As we have seen above, for C++ applications it is possible to use sandboxing but C# application can not use sandboxed CEF. But why ?</p>

<p>To achieve effective sandboxing in your CEF application, ensure that you link the <code class="language-plaintext highlighter-rouge">cef_sandbox.lib</code> static library. This linking must be done specifically to the main process of the application. While C++ applications can directly link static libraries without issue, C# applications do not support static linking of libraries.</p>

<blockquote>
  <p><code class="language-plaintext highlighter-rouge">Static library means that the library is going to be merged with application. This concept doesn't exist in .NET as .NET supports only dynamic link libraries</code></p>
</blockquote>

<p>If you attempt to create a DLL for the cef_sandbox code and link it dynamically to your application, the Chromium sandbox code will detect this and fail with the error <a href="https://source.chromium.org/chromium/chromium/src/+/main:sandbox/win/src/sandbox_types.h;l=154?q=SBOX_ERROR_INVALID_LINK_STATE">SBOX_ERROR_INVALID_LINK_STATE</a>. Therefore, static linking of the sandboxing code to the main application is mandatory for sandbox functionality.</p>

<div class="language-plaintext highlighter-rouge"><div class="highlight"><pre class="highlight"><code>  // Attempt to start a sandboxed process from sandbox code hosted not within
  // the main EXE. This is an unsupported operation by the sandbox.
  SBOX_ERROR_INVALID_LINK_STATE = 64,
</code></pre></div></div>
<hr />
<h3 id="conclusion">Conclusion</h3>
<p>While sandboxing is a powerful feature available for C++ applications using CEF, it is not feasible for C# applications due to the inherent differences in how these languages operate within the system. The managed environment of C# introduces limitations that make it impossible to integrate the same level of sandboxing as in C++. Consequently, C# applications cannot leverage sandboxed CEF using the existing setup.</p>

<hr />
<h3 id="future-study">Future study</h3>
<p>To enable sandboxing in C# applications, we may need to modify the .NET <a href="https://github.com/.NET/runtime">runtime</a> (which is written in C++) to support sandboxing. This would involve linking the cef_sandbox library directly to the runtime. The .NET Core runtime includes several executables/libraries that act as the main entry point for code execution, typically referred to as the “<a href="https://github.com/.NET/runtime/blob/main/docs/design/features/host-components.md">host</a>”. These host executables can be customized as needed.</p>

<p>For example, when you run the apphost executable, it initializes the .NET Core runtime and starts your application. Creating a sandbox object in the apphost and passing it to the application might help address sandboxing for C# applications. However, this approach has not been tested, so its effectiveness cannot be confirmed without further exploration and modification of the C# language runtime.</p>

<hr />

<p><strong>References</strong></p>
<ul>
  <li><a href="https://stackoverflow.com/questions/1590337/using-the-google-chrome-sandbox">https://stackoverflow.com/questions/1590337/using-the-google-chrome-sandbox</a></li>
  <li><a href="https://chromium.googlesource.com/chromium/src/+/HEAD/docs/design/sandbox.md">https://chromium.googlesource.com/chromium/src/+/HEAD/docs/design/sandbox.md</a></li>
  <li><a href="https://chromium.googlesource.com/chromium/src/+/HEAD/docs/design/sandbox_faq.md">https://chromium.googlesource.com/chromium/src/+/HEAD/docs/design/sandbox_faq.md</a></li>
</ul>]]></content><author><name></name></author><summary type="html"><![CDATA[Sandboxing is a critical feature for ensuring the security and stability of applications that embed web content. In this blog, we will delve into how sandboxing is achieved in the Chromium Embedded Framework (CEF). All analysis in this blog is performed on Windows operating system.]]></summary></entry><entry><title type="html">Improving disk read performance</title><link href="https://abhijeetk.github.io/improving-disk-read-performance/" rel="alternate" type="text/html" title="Improving disk read performance" /><published>2022-11-02T00:00:00+05:30</published><updated>2022-11-02T00:00:00+05:30</updated><id>https://abhijeetk.github.io/improving-disk-read-performance</id><content type="html" xml:base="https://abhijeetk.github.io/improving-disk-read-performance/"><![CDATA[<p>When I started working on analyzing the startup time of a browser, I didn’t have an idea where to start. For me, Performance was a number game and trial-n-error approach. The challenge I was looking into is described in bug <a href="https://bugs.chromium.org/p/chromium/issues/detail?id=1270977">1270977</a>, in which the chrome binary hosted on two different partitions behaved differently.</p>

<table>
  <thead>
    <tr>
      <th>BROWSER</th>
      <th>LaCrOS</th>
      <th>Mount point</th>
      <th>Partition</th>
      <th>fs type</th>
      <th>comment</th>
    </tr>
  </thead>
  <tbody>
    <tr>
      <td>B1</td>
      <td>stateful</td>
      <td>/run/imageloader/lacros-*/chrome</td>
      <td>stateful</td>
      <td>squashfs</td>
      <td>downloaded</td>
    </tr>
    <tr>
      <td>B2</td>
      <td>deployedLacros</td>
      <td>/usr/local/lacros-chrome</td>
      <td>stateful</td>
      <td>ext4</td>
      <td>pushed by developer</td>
    </tr>
  </tbody>
</table>

<p>You can learn more about LaCrOS in my previous <a href="https://abhijeetk.github.io/What-is-LaCrOS/">blog</a>.
From the above table, the difference in filesystem was the first suspect. Squashfs is a compressed read-only file system for Linux.</p>

<p>To emulate the first launch, all caches are cleared using drop_caches as below.
<code class="language-plaintext highlighter-rouge">echo 3 &gt; /proc/sys/vm/drop_caches</code></p>

<h4 id="how-to-measure-a-file-system-read-time">How to measure a file system read time?</h4>

<p>For investigation and testing/benchmarking,  sequential read requests are emulated using a <code class="language-plaintext highlighter-rouge">dd</code> command and random read requests are emulated using <code class="language-plaintext highlighter-rouge">fio</code>(Flexible IO Tester)</p>

<p>For sequential read, B1 took around <strong>92MB/s</strong> while B2 took <strong>242MB/s</strong>.(Higher read speed means faster). Its a huge difference. <code class="language-plaintext highlighter-rouge">ext4</code> is faster than <code class="language-plaintext highlighter-rouge">squashfs</code>.</p>

<div class="language-plaintext highlighter-rouge"><div class="highlight"><pre class="highlight"><code>localhost ~ # echo 3 &gt; /proc/sys/vm/drop_caches
localhost ~ # time dd
if=/run/imageloader/lacros-dogfood-dev/99.0.4824.0/chrome of=/dev/null bs=4096
43910+1 records in
43910+1 records out
179859368 bytes (180 MB, 172 MiB) copied, 1.93517 s, 92.9 MB/s

real    0m1.951s
user    0m0.020s
sys 0m0.637s
</code></pre></div></div>

<div class="language-plaintext highlighter-rouge"><div class="highlight"><pre class="highlight"><code>localhost ~ # echo 3 &gt; /proc/sys/vm/drop_caches
localhost ~ # time dd if=/usr/local/lacros-chrome/chrome of=/dev/null bs=4096
43910+1 records in
43910+1 records out
179859368 bytes (180 MB, 172 MiB) copied, 0.744337 s, 242 MB/s

real    0m0.767s
user    0m0.056s
sys 0m0.285s

</code></pre></div></div>

<p>As Squashfs is a compressed file system, it first uncompresses the data and then performs a read. So definitely it’s going to be slower than ext4 but the difference(242 -92) was huge and unacceptable.</p>

<h4 id="can-we-do-better">Can we do better?</h4>

<p>The next step was to find some tools that could provide more information.</p>

<ul>
  <li>strace -  Linux utility to find out system calls that take more time or have blocking IO. But couldn’t get much information out of this analysis.</li>
  <li><a href="https://man7.org/linux/man-pages/man1/iostat.1.html">iostat</a> - This provides more insight information for input/output</li>
</ul>

<p><code class="language-plaintext highlighter-rouge">$echo 3 &gt; /proc/sys/vm/drop_caches &amp;&amp; iostat -d -tc -xm 1 20</code></p>

<p>After running this command for both B1 and B2, it appears that B1 is not merging read requests. In other words, rrqm/s and %rrqm values are ZERO. Refer <a href="https://man7.org/linux/man-pages/man1/iostat.1.html">man-iostat</a></p>

<blockquote>
  <p>%rrqm  The percentage of read requests merged together
before being sent to the device.</p>

  <p>rrqm/s The number of read requests merged per second that
were queued to the device.</p>
</blockquote>

<p>The data to be read is scattered in different sectors of a different block. As a result of scattering, the read requests were not merged, so there could be a lot of read requests down to the block device.</p>

<p>Next step was to find out who is responsible for merging read requests.</p>

<h4 id="io-scheduler">IO scheduler</h4>

<p><a href="https://wiki.ubuntu.com/Kernel/Reference/IOSchedulers">IO scheduler</a> optimizes disk access requests by merging I/O requests to similar locations on disk.
To get the current IO scheduler for a disk-device</p>

<div class="language-plaintext highlighter-rouge"><div class="highlight"><pre class="highlight"><code>$/sys/block/&lt;disk device&gt;/queue/scheduler
</code></pre></div></div>

<p>for B1,</p>

<div class="language-plaintext highlighter-rouge"><div class="highlight"><pre class="highlight"><code>localhost ~ # cat /sys/block/dm-1/queue/scheduler 
none
</code></pre></div></div>

<p>For B2, it uses the bfq scheduler</p>

<div class="language-plaintext highlighter-rouge"><div class="highlight"><pre class="highlight"><code>localhost ~ # cat /sys/block/mmcblk0/queue/scheduler 
mq-deadline kyber [bfq] none
</code></pre></div></div>

<p>As you can notice, B1 does not have scheduler. For B2, scheduler is <a href="https://docs.kernel.org/block/bfq-iosched.html">bfq</a>(Budget Fair Queueing).</p>

<p><a href="https://documentation.suse.com/sles/15-SP3/html/SLES-all/cha-tuning-io.html">SUSE</a> and <a href="https://www.ibm.com/docs/en/linux-on-systems?topic=linuxonibm/performance/tuneforsybase/ioschedulers.htm">IBM</a> has good documentation about IO scheduling.</p>

<p>It has been found so far that there are differences between file systems, read request merge patterns, and IO schedulers. But there is one more difference which we havent noticed yet.</p>

<p>If you look at how B1 is mounted, you will see that we are using a virtual device.</p>

<div class="language-plaintext highlighter-rouge"><div class="highlight"><pre class="highlight"><code>localhost ~ # df -TH
Filesystem  Type      Size  Used  Avail  Use%  Mounted on
/dev/dm-1   squashfs  143M  143M      0  100%  /run/imageloader/lacros-dogfood-dev/99.0.4824.0
</code></pre></div></div>

<h4 id="a-twist-in-my-story">A twist in my story</h4>

<p>For B1, we are not directly communicating with the block device instead the requests are going through a virtual device using a device mapper.
As you might have noticed above, <code class="language-plaintext highlighter-rouge">dm-1</code> device mapper virtual device is used by B1.</p>

<p>Read more about a device-mapper and refer to the diagram on <a href="https://en.wikipedia.org/wiki/Device_mapper">wikipedia</a> page.</p>

<p>We are using a dm-verity as a virtual device.</p>
<blockquote>
  <p>Device-Mapper’s “verity” target provides transparent integrity checking of block devices using a cryptographic digest provided by the kernel crypto API. This target is read-only.</p>
</blockquote>

<p>From a security point of view, it makes sense to host your executable binary to a read-only files system that provides integrity checking.</p>

<p>There is a twist in that dm-verity does not have a scheduler, and scheduling is delegated to the scheduler of the underlying block device. The I/O will not be merged at the device-mapper layer, but at an underlying layer.</p>

<p><img src="https://notes.igalia.com/uploads/e41f5131-bb6a-4fe8-9b01-1082efdcbd9c.png" alt="" /></p>

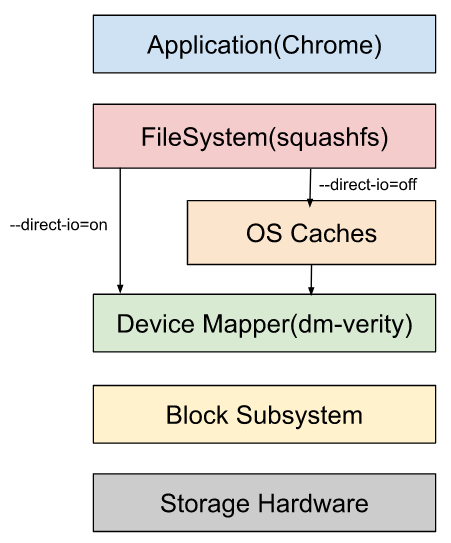
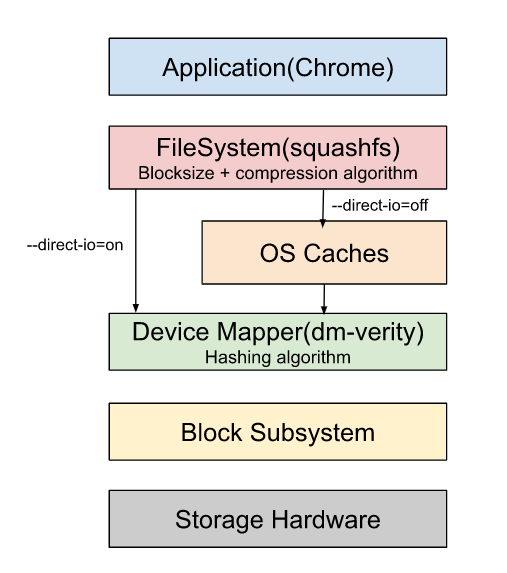
<p>Several layers are different between B1 and B2, including partition encryption(dm-verity) and compression(squashfs).</p>

<p>In addition, we found that B1 defaults to using <code class="language-plaintext highlighter-rouge">--direct-io</code></p>

<h3 id="what-is-direct-io-">What is DIRECT IO ?</h3>

<p>Direct I/O is a feature of the <em>file system</em> whereby file reads and writes go directly from the applications to the storage device, bypassing the operating system read and write caches.</p>

<p>Although direct I/O can reduce CPU usage, using it typically results in the process taking longer to complete, <strong>especially for relatively <em>small</em> requests</strong>. This penalty is caused by the fundamental differences between normal cached I/O and direct I/O.</p>

<p>Every direct I/O read causes a synchronous read from the disk; unlike the normal cached I/O policy where the read may be satisfied from the cache. This can result in very <em>poor</em> performance if the data was likely to be in memory under the normal caching policy.</p>

<h3 id="is-it-possible-to-control-how-many-read-requests-are-made">Is it possible to control how many read requests are made?</h3>

<p>We decided to go deeper and analyze the block layer. In the block layer the request queue is handled, and I/O scheduling is done. To see how the flow of IO goes through the block layer, there is a suit of tools consisting of</p>

<ul>
  <li>blktrace (tracing the IO requests through the block layer),</li>
  <li>blkparse (parsing the output of blktrace to make it human readable),</li>
  <li>btrace (script to combine blktrace and blkparse, and</li>
  <li><a href="https://usermanual.wiki/Document/bttmanual.1495776143/view">btt</a> (a blktrace output post-processing tool)), among others.</li>
</ul>

<p>Below is the result of block-level parsing.</p>

<p>For B1,</p>

<table>
  <thead>
    <tr>
      <th>ALL</th>
      <th>MIN</th>
      <th>AVG</th>
      <th>MAX</th>
      <th>N</th>
    </tr>
  </thead>
  <tbody>
    <tr>
      <td>Q2Q</td>
      <td>0.000000001</td>
      <td>0.000069861</td>
      <td>0.004097547</td>
      <td>94883</td>
    </tr>
    <tr>
      <td>Q2G</td>
      <td>0.000000242</td>
      <td>0.000000543</td>
      <td>0.000132620</td>
      <td>94884</td>
    </tr>
    <tr>
      <td>G2I</td>
      <td>0.000000613</td>
      <td>0.000001455</td>
      <td>0.003585980</td>
      <td>94884</td>
    </tr>
    <tr>
      <td>I2D</td>
      <td>0.000001399</td>
      <td>0.000002456</td>
      <td>0.003777911</td>
      <td>94884</td>
    </tr>
    <tr>
      <td>D2C</td>
      <td>0.000133042</td>
      <td>0.000176883</td>
      <td>0.001771526</td>
      <td>23721</td>
    </tr>
    <tr>
      <td>Q2C</td>
      <td>0.000136308</td>
      <td>0.000181337</td>
      <td>0.003968613</td>
      <td>23721</td>
    </tr>
  </tbody>
</table>

<p>For B2,</p>

<table>
  <thead>
    <tr>
      <th>ALL</th>
      <th>MIN</th>
      <th>AVG</th>
      <th>MAX</th>
      <th>N</th>
    </tr>
  </thead>
  <tbody>
    <tr>
      <td>Q2Q</td>
      <td>0.000000001</td>
      <td>0.000016582</td>
      <td>0.003283451</td>
      <td>76171</td>
    </tr>
    <tr>
      <td>Q2G</td>
      <td>0.000000178</td>
      <td>0.000000228</td>
      <td>0.000016893</td>
      <td>76172</td>
    </tr>
    <tr>
      <td>G2I</td>
      <td>0.000000626</td>
      <td>0.000005904</td>
      <td>0.000587304</td>
      <td>76172</td>
    </tr>
    <tr>
      <td>I2D</td>
      <td>0.000002011</td>
      <td>0.000007582</td>
      <td>0.000861783</td>
      <td>76172</td>
    </tr>
    <tr>
      <td>D2C</td>
      <td>0.000004959</td>
      <td>0.000067955</td>
      <td>0.001275667</td>
      <td>19043</td>
    </tr>
    <tr>
      <td>Q2C</td>
      <td>0.000009132</td>
      <td>0.000081670</td>
      <td>0.001315828</td>
      <td>19043</td>
    </tr>
  </tbody>
</table>

<ul>
  <li>Number of read requests(N) are more for B1 than B2.
    <ul>
      <li>For B1, N = 94883 (partition with <code class="language-plaintext highlighter-rouge">squashfs + dm-verity</code>)</li>
      <li>For B2, N = 76171 (ext4 partition)</li>
    </ul>
  </li>
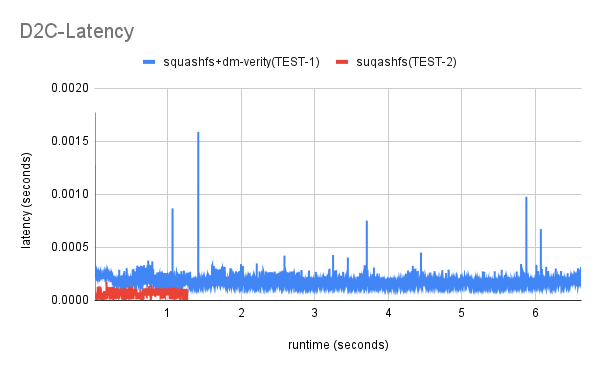
  <li>Average <a href="https://github.com/efarrer/blktrace/blob/d1927de948d47a85caf396b327b30a19ca711990/btt/doc/btt.tex#L144">D2C</a> time for B1 is more than twice that of B2 <code class="language-plaintext highlighter-rouge">(0.000176883 &gt; 2*0.000067955)</code>.</li>
</ul>

<p>D2C time: the average time from when the actual IO was issued to the driver until is completed (completion trace) back to the block IO layer.</p>

<p><code class="language-plaintext highlighter-rouge">--d2c-latencies</code> option: This option instructs <code class="language-plaintext highlighter-rouge">btt</code> to generate the D2C latency ﬁle. This file has the ﬁrst column (X values) representing runtime (seconds), while the second column (Y values) shows the actual latency for command at that time (either Q2D, D2C or Q2C).
<img src="https://notes.igalia.com/uploads/7eeac300-8cc6-4bd6-8b9d-295474469357.png" alt="" /></p>

<h3 id="fioflexible-io-tester">FIO(Flexible IO Tester)</h3>

<p>Up until now, all analysis has been performed using a <code class="language-plaintext highlighter-rouge">dd</code> which emulate sequential read requests.</p>

<p>Read access pattern also affects a IO performace so to emulated a random IO workloads tools like FIO is useful.</p>

<p>When you specify a <code class="language-plaintext highlighter-rouge">--size</code>, FIO creates a file with <code class="language-plaintext highlighter-rouge">filename</code> and when you don’ specify it FIO reads form a <code class="language-plaintext highlighter-rouge">filename</code>.</p>

<p>We are testing an existing chrome binary without providing its size.</p>

<p><code class="language-plaintext highlighter-rouge">localhost~# fio --name=4k_read --ioengine=libaio --iodepth=1 --rw=randread --bs=4k --norandommap --filename=&lt;dir&gt;/chrome</code></p>

<h3 id="hotspots">Hotspots</h3>

<p>A “hotspot” is a place where the app is spending a lot of time. After performing above analysis,  find those areas and speed them up. This is easily done using a profiling tool like
It has been found so far that there are differences between file systems, read request merge patterns, and IO schedulers. But there one more difference which we havent noticed yet.</p>

<p>For optimal performance,</p>

<ul>
  <li>reduce the number of requests (N)
    <ul>
      <li>by tuning the <em>blocksize</em> of the filesystem(squashfs) of the partition</li>
    </ul>
  </li>
  <li>reduce the time taken to process each request(D2C)
    <ul>
      <li>by tuning a compression algorithm used by squashfs filesystem</li>
      <li>by tuning a hashing function used by dm-verity</li>
    </ul>
  </li>
</ul>

<h4 id="tuning-a-blocksize">Tuning a blocksize</h4>

<p>Block is a continuous location on the hard drive where data is stored. In general, FileSystem stores data as a collection of blocks. When the block size is small, the data gets divided into blocks and distributed in more blocks. As more blocks are created, there will be more number of read requests.</p>

<p>Squashfs compresses files, inodes, and directories, and supports block sizes from 4 KiB up to 1 MiB for greater compression.</p>

<p>We experimented with different block sizes of 4K, 64K, 128K, 256K. As the block size is increasing, the read speed for DD is increasing. We have chosen 128K.</p>

<p><code class="language-plaintext highlighter-rouge">mksquashfs /tmp/squashfs-root /home/chronos/cros-components/lacros-dogfood-dev/100.0.4881.0/image.squash.test.&lt;block-size&gt; -b &lt;block-size&gt;K</code></p>

<h4 id="tuning-a-compression-algorithm">Tuning a compression algorithm</h4>

<p>Squashfs supports different compression algorithms. <code class="language-plaintext highlighter-rouge">mksquashfs</code> command has the option <code class="language-plaintext highlighter-rouge">-comp &lt;comp&gt;</code> to configure the compression algorithm. There are different compressors available:</p>

<ul>
  <li>gzip (default)</li>
  <li>lzma</li>
  <li>lzo</li>
  <li>lz4</li>
  <li>xz</li>
  <li>zstd</li>
</ul>

<p><code class="language-plaintext highlighter-rouge">mksquashfs /tmp/squashfs-root /home/chronos/cros-components/lacros-dogfood-dev/100.0.4881.0/image.squash.test.&lt;block-size&gt; -b &lt;block-size&gt;K -comp gzip</code></p>

<h4 id="tuning-a-hashing-algorithm">Tuning a hashing algorithm</h4>

<p>This is related to dm-verity. <a href="https://chromium.googlesource.com/chromiumos/platform/dm-verity/+/refs/heads/main/verity_main.cc#18">dm-verity</a> decrypt the read request. It uses different hashing algorithms.</p>

<ul>
  <li>sha256 (default)</li>
  <li>sha224</li>
  <li>sha1</li>
  <li>md5
We can use hardware implementation of the above algorithms to speed up things.</li>
</ul>

<h3 id="conclusion">Conclusion</h3>

<p>The purpose of this blog post is to demonstrate how to identify the hotspot and how to explore different parameters affecting the system’s performance. It was an interesting experience and I learned a lot. By sharing all the details about how the problem was broken down and improved, I hope others can learn something as well. As a result of playing around with the various combinations of parameters such as blocksize, compression, and direct-io, we have decided to go with the following configuration.</p>

<ol>
  <li>For Filesystem,
    <ul>
      <li>Blocksize : Changed from <code class="language-plaintext highlighter-rouge">4K</code> to <code class="language-plaintext highlighter-rouge">128K</code></li>
      <li>Compression algorithm : Changed from <code class="language-plaintext highlighter-rouge">gzip</code> to <code class="language-plaintext highlighter-rouge">xz</code></li>
      <li>direct-io : Changed from <code class="language-plaintext highlighter-rouge">on</code> to <code class="language-plaintext highlighter-rouge">off</code></li>
    </ul>
  </li>
  <li>dm-verity :
    <ul>
      <li>Hashing algorithm : Currently it used <code class="language-plaintext highlighter-rouge">sha256</code>. Either use hardware implementation of <code class="language-plaintext highlighter-rouge">sha256</code> or switch to other algorithm.</li>
    </ul>
  </li>
</ol>

<p><img src="https://notes.igalia.com/uploads/b0a8e7e7-8d1a-48bf-a295-060206faa5c0.png" alt="" /></p>

<p>Your first step should be to identify your current stack and then analyze each layer of your file system stack using the available tools and optimize them. The information provided in this blog may be helpful to you in deciding what to do about your own performance issues. You can get it touch with <a href="abhijeet@igalia.com">me</a> if you need any help.</p>]]></content><author><name></name></author><summary type="html"><![CDATA[When I started working on analyzing the startup time of a browser, I didn’t have an idea where to start. For me, Performance was a number game and trial-n-error approach. The challenge I was looking into is described in bug 1270977, in which the chrome binary hosted on two different partitions behaved differently.]]></summary></entry><entry><title type="html">Introduction to LaCrOS</title><link href="https://abhijeetk.github.io/What-is-LaCrOS/" rel="alternate" type="text/html" title="Introduction to LaCrOS" /><published>2021-01-03T00:00:00+05:30</published><updated>2021-01-03T00:00:00+05:30</updated><id>https://abhijeetk.github.io/What-is-LaCrOS</id><content type="html" xml:base="https://abhijeetk.github.io/What-is-LaCrOS/"><![CDATA[<p>Happy new year to All !!!</p>

<p>Igalia has been collaborating with Google on the LaCrOS project for over a year and has presented updates of the LaCrOS project in the last two BlinkOns.</p>

<p>See ours lightning talk during <a href="https://www.youtube.com/watch?v=6Wgh5x7mLSM&amp;t=1621s">BlinkOn13</a> , and our update from <a href="https://www.youtube.com/watch?v=VrEP7SPfQVM&amp;t=2514s">BlinkOn14</a></p>

<h2 id="what-is-lacros-">What is LaCrOS ?</h2>

<p>For the unfamiliar , the <a href="https://source.chromium.org/chromium/chromium/src/+/main:docs/lacros.md">LaCrOS</a> project decouples the Chrome browser from the Chrome OS window manager and system UI. The name comes from <strong>L</strong>inux <strong>A</strong>nd <strong>C</strong>h<strong>R</strong>ome<strong>OS</strong>.</p>

<p>But, why do we need to do that ? Let’s jump to more details.</p>

<h2 id="why-lacros-">Why LaCrOs ?</h2>

<p>Previously, ChromeOS and Chrome Browser shared the same window manager and system UI binaries, making it difficult for Chrome Browser alone to be updated on Chromebook devices.</p>

<p>This means, when a ChromeOS device is updated, only then the Chrome Browser is updated. It might be frustrating for someone who frequently switches from the latest desktop browser to a browser on ChromeOS.</p>

<p>LaCrOS is Google’s solution to this problem. It allows browser on ChromeOS to update independently of the operating system. Now, old chromebook devices also can have the latest Chrome Browser.</p>

<blockquote>
  <p>Separating the browser from the OS itself allows the end user to update the browser independently as we do for other devices like desktop, mobile.</p>
</blockquote>

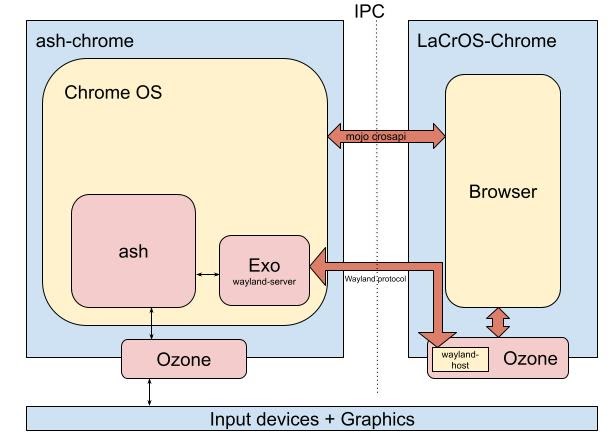
<p>On Chrome OS, the system UI (including the Ash Window Manager, login screen, etc) and the Web Browser are included in the same binary.  LaCrOS separates this functionality into two binaries. Both of these binaries are built from the same chromium git repository, but they might have different versions. This means, Web Browser and ChromeOS can have different versions and will be updated separately.</p>

<p>Some of the key LaCrOS components are ChromeOS’ built-in Wayland Compositor (<a href="https://source.chromium.org/chromium/chromium/src/+/main:components/exo/">Exo</a>) and the native Linux Wayland support (on top of <a href="https://source.chromium.org/chromium/chromium/src/+/main:docs/ozone_overview.md">Ozone</a>). As part of the project, Linux <a href="https://chromium.googlesource.com/chromium/src/+/main/ui/ozone/platform/wayland/README.md">Wayland</a> is being enhanced to implement ChromeOS specific functionality so that the a newly created browser acts like a Web Browser under ChromeOS.</p>

<p>This new browser which uses Linux Wayland support underneath to communicate with ChromeOS is called a LaCrOS(<strong>L</strong>inux <strong>A</strong>nd <strong>C</strong>h<strong>R</strong>ome<strong>OS</strong>).</p>

<p>In terms of wayland terminology, a LaCrOS-Chrome is a wayland-client and Exo is a wayland-server.</p>

<p>LaCrOS development involves both client and server code changes. ChromeOS implements handlers for requests coming from LaCrOS Browser, and LaCrOS Browser implements handlers for events coming from ChromeOS.</p>

<h2 id="what-is-ash-chrome-">What is Ash-Chrome ?</h2>

<p>Ash-Chrome is the default browser of ChromeOS which is tightly coupled with ChromeOS. For client-server architecture, Ash-Chrome is often referred as a server and used as a synonymous to ChromeOS or Exo.</p>

<p>LaCrOS client request a information from a Ash-Chrome server.</p>

<h2 id="what-is-exo-">What is Exo ?</h2>

<p><a href="https://source.chromium.org/chromium/chromium/src/+/main:components/exo/">Exo</a>(or Exosphere) is a wayland server implementation. LaCrOS is one of the client of Exo. There are other clients of Exo which includes ARC++(Android Apps on ChromeOS) and Crostini (Linux apps on Chrome OS).</p>

<h2 id="a-simplified-lacros-architecture">A simplified LaCrOS Architecture</h2>

<p><img src="https://notes.igalia.com/uploads/b15227e6fe0fbdf1d7661a302.jpg" alt="" /></p>

<p>In the above diagram, LaCrOS Browser communicates with ChromeOS(Ash-Chrome) using a wayland protocol. LaCrOS uses various wayland protocols</p>
<ul>
  <li><a href="https://source.chromium.org/chromium/chromium/src/+/main:third_party/wayland-protocols/">Official</a> wayland protocols - These are developed by the Wayland community and well known desktop environments.</li>
  <li><a href="https://source.chromium.org/chromium/chromium/src/+/main:components/exo/wayland/protocol/">Non-official</a> wayland protocols - These protocols are specific to ChromeOS.</li>
</ul>

<p>Exo is a wayland server and it supports both the official and non-official wayland protocols. Just for an example, <a href="https://source.chromium.org/chromium/chromium/src/+/main:components/exo/wayland/protocol/aura-shell.xml">aura_shell</a> is a non-official protocol which allows the LaCrOS browser to support the ChromeOS specific features like snapping a window and many more.</p>

<p>Implementation of LaCrOS is inspired from Chrome on desktop linux. My colleague <a href="mailto:msisov@igalia.com">Maksim</a> in his talk <a href="https://www.youtube.com/watch?v=8t4DUIZ94pk">Waylandifying Chromium</a> has explained how a Wayland is used in Chromium.</p>

<p>Next obvious question would be how to build and run the LaCrOS Browser and contribute to feature LaCrOS development.</p>

<h2 id="build--run">Build &amp; Run</h2>
<p>Refer to <a href="https://chromium.googlesource.com/chromium/src/+/refs/heads/main/docs/chromeos_build_instructions.md#chromium-os-on-linux-linux_chromeos">Chromium OS on Linux (linux-chromeos)</a> before building code</p>

<p>You can download a <a href="https://www.chromium.org/developers/gn-build-configuration/">GN</a> args necessary to build a LaCrOS on linux-desktop from an already running <code class="language-plaintext highlighter-rouge">linux-lacros-rel</code> build bot.</p>

<div class="language-plaintext highlighter-rouge"><div class="highlight"><pre class="highlight"><code>chromium/src$tools/mb/mb.py gen -m tryserver.chromium.chromiumos -b \'linux-lacros-rel' out/linux-lacros-rel
</code></pre></div></div>

<p>The above command downloads the GN args and writes the file name args.gn in the output directory <code class="language-plaintext highlighter-rouge">out/linux-lacros-rel</code>.</p>

<div class="language-plaintext highlighter-rouge"><div class="highlight"><pre class="highlight"><code># file: args.gn
also_build_ash_chrome = true
blink_enable_generated_code_formatting = false
chromeos_is_browser_only = true
dcheck_always_on = true
is_component_build = false
is_debug = false
symbol_level = 0
target_os = "chromeos"
use_goma = true
</code></pre></div></div>
<p><code class="language-plaintext highlighter-rouge">also_build_ash_chrome = true</code> tells a <a href="https://chromium.googlesource.com/chromium/src.git/+/56.0.2924.56/docs/ninja_build.md">ninja</a> to build Ash-Chrome(wayland server) along with LaCrOS Browser(wayland client)</p>

<ul>
  <li>
    <h3 id="build">Build</h3>
    <p>To build the code run the below command from your chromium source directory.</p>
    <div class="language-plaintext highlighter-rouge"><div class="highlight"><pre class="highlight"><code>chromium/src$autoninja -C out/linux-lacros-rel/ chrome all -j500
</code></pre></div>    </div>
    <p>After build, Ash-Chrome is located at location <code class="language-plaintext highlighter-rouge">out/linux-lacros-rel/ash_clang_x64/test_ash_chrome</code> and LaCrOS Browser is located at location <code class="language-plaintext highlighter-rouge">out/linux-lacros-rel/chrome</code>.</p>
  </li>
  <li>
    <h3 id="run">Run</h3>
    <p>To run the use the below command</p>
    <div class="language-plaintext highlighter-rouge"><div class="highlight"><pre class="highlight"><code>chromium/src$XDG_RUNTIME_DIR=/tmp/ash_chrome_xdg_runtime out/linux-lacros-rel/ash_clang_x64/test_ash_chrome --user-data-dir=/tmp/ash-chrome --enable-wayland-server --no-startup-window --enable-features=LacrosSupport --lacros-chrome-path=$PWD/out/linux-lacros-rel --enable-logging=stderr
</code></pre></div>    </div>
    <p>It launches the ChromiumOS emulator with support for LaCrOS browser
The instructions to run are also publicly available on some issues on <a href="https://bugs.chromium.org/p/chromium/issues/list?q=%22--lacros-chrome-path%22&amp;can=1">crbug.com.</a> If you want more information about the different command line parameters, you can check bugs.</p>
  </li>
</ul>

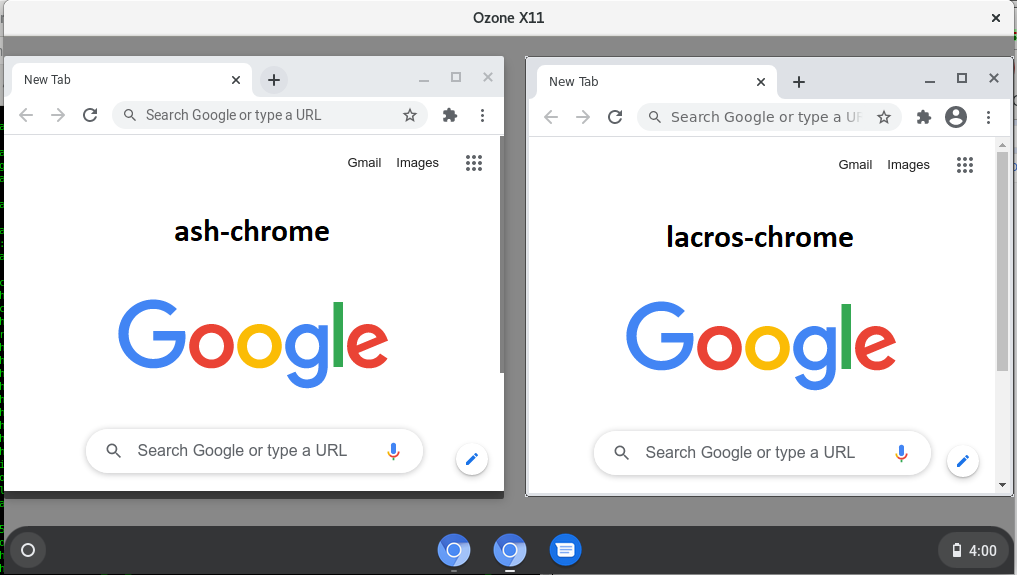
<h2 id="lacros-window-during-blinkon-13">LaCrOS window during BlinkOn 13</h2>

<p><img src="https://notes.igalia.com/uploads/b15227e6fe0fbdf1d7661a304.png" alt="" /></p>

<p>In the above image, the window of LaCrOS-Chrome looks visually different from the Ash-Chrome. If you look carefully, you will notice that the scrollbar and the browser window’s frame appear differently and LaCrOS-Chrome does not have drop shadows.</p>

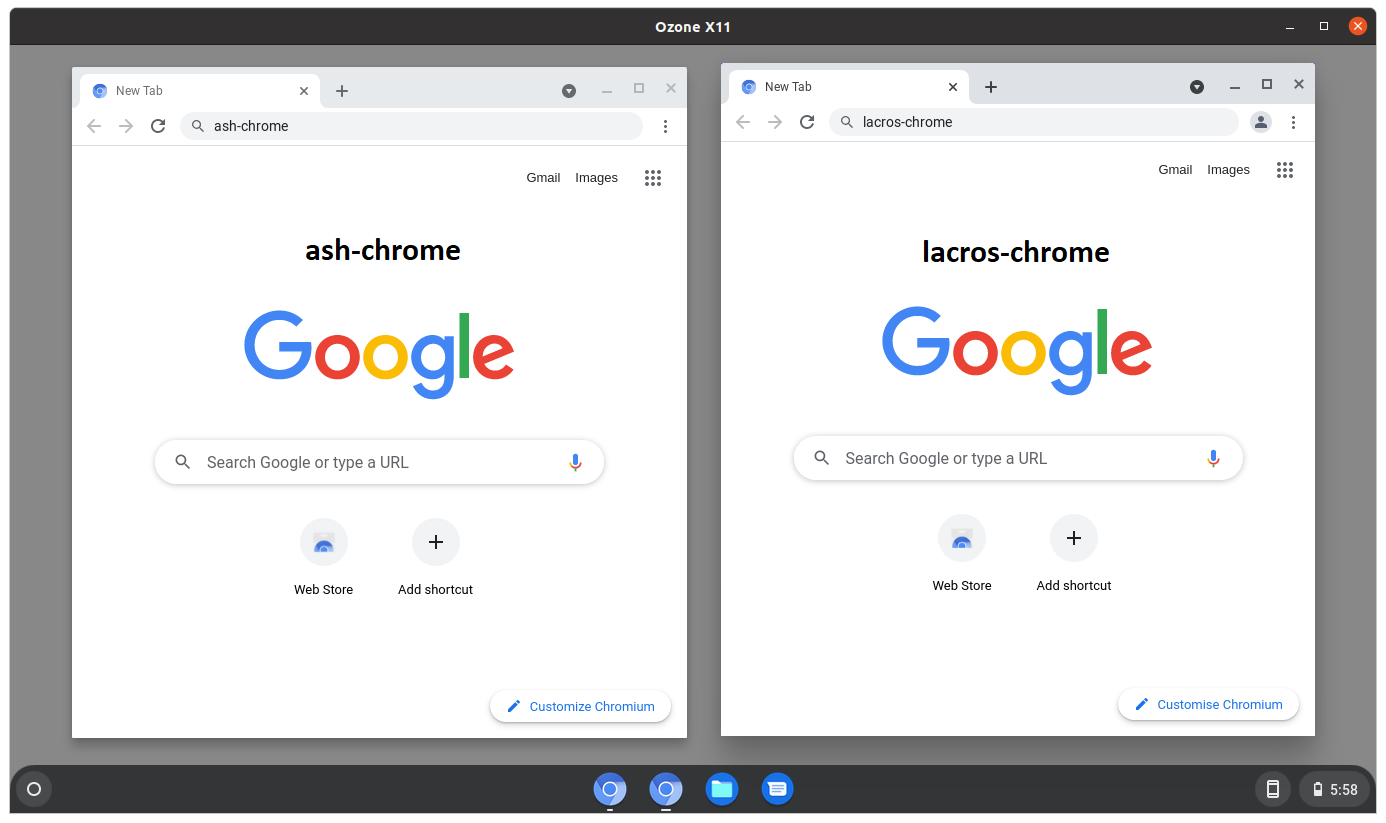
<h2 id="lacros-window-during-blinkon-14">LaCrOS window during BlinkOn 14</h2>

<p><img src="https://notes.igalia.com/uploads/b15227e6fe0fbdf1d7661a305.png" alt="" /></p>

<p>This image depicts the state of LaCrOS Browser at the time of <a href="https://www.chromium.org/events/blinkon-14">the BlinkOn 14 conference</a>. As you can see both browsers look almost identical.</p>

<h2 id="igalias-contribution-to-lacros-in-2021">Igalia’s contribution to LaCrOS in 2021</h2>
<p>To achieve visual parity between both browsers, our team at Igalia has worked to support various features and bugs related to</p>
<ul>
  <li>Rounded corners for browser window</li>
  <li>Scrollbars style, thickness and fade behavior</li>
  <li>Resizing behavior</li>
  <li>Shadows (Drop shadow for window &amp; menu, resizer shadow)</li>
  <li>Menus (Right-Click menus, Three-Dot menus)</li>
  <li>Tooltips</li>
  <li>Tablet mode</li>
  <li>Window Snapping</li>
  <li>HiDPI/Mixed DPI</li>
  <li>Touch based window dragging support</li>
  <li>Multiple display</li>
  <li>Scaling</li>
  <li>Enhanced tab dragging</li>
</ul>

<p>LaCrOS Browser evolution in the last one year can be seen in this video.</p>

<figure class="video_container">
  <iframe src="https://www.youtube.com/embed/LWF-aCcWyLI" frameborder="0" allowfullscreen="true"> </iframe>
</figure>

<p>This video demonstrated the visual similarities between the Ash-Chrome and LaCrOS-Chrome. You can notice the similarities for</p>
<ul>
  <li>Drop shadows for a browser window frame</li>
  <li>Resizer shadows after hovering a mouse on browser window edges</li>
  <li>Right-Click menus, Three-Dot menus look and feel is same</li>
  <li>Scrollbars</li>
  <li>Window snapping for LaCrOS Browser window</li>
  <li>Workspace resizing</li>
</ul>

<h2 id="and-more-">And more …</h2>
<p>In addition to what has been commented above, we recently completed the <strong>Multi Desk</strong> support and <strong>WebUI Tab Strip</strong> features:</p>
<ul>
  <li>Multi-Desk 
This feature allows the user to add desks to organize multiple windows and multi-task.
The LaCrOS-Chrome browser supports this feature by adding a request to a aura_shell wayland protocol. My colleague <a href="mailto:mkim@igalia.com">Minju Kim</a> has contributed to an implementation of this feature.
See the working of the Multi-Desk in LaCrOS in the video below.</li>
</ul>

<figure class="video_container">
  <iframe src="https://www.youtube.com/embed/BuyocSkrbl4" frameborder="0" allowfullscreen="true"> </iframe>
</figure>

<ul>
  <li>WebUi Tab Strip
This feature adds a new tab bar to the browser, featuring page thumbnail previews and a touch friendly UI. My colleague <a href="mailto:tonikitoo@igalia.com">Antonio</a> has contributed to an implementation of this feature.</li>
</ul>

<p>Last but not least, our Chromium team is also working in parallel on fixing several window manager integration issues as part of this work, so please stay tuned for more updates on our efforts related to LaCrOS development :)</p>]]></content><author><name></name></author><summary type="html"><![CDATA[Happy new year to All !!!]]></summary></entry><entry><title type="html">Up and running WebChimera with nwjs</title><link href="https://abhijeetk.github.io/Up-and-running-WebChimera-with-nwjs-Win/" rel="alternate" type="text/html" title="Up and running WebChimera with nwjs" /><published>2016-11-11T00:00:00+05:30</published><updated>2016-11-11T00:00:00+05:30</updated><id>https://abhijeetk.github.io/Up-and-running-WebChimera-with-nwjs-Win</id><content type="html" xml:base="https://abhijeetk.github.io/Up-and-running-WebChimera-with-nwjs-Win/"><![CDATA[<ul>
  <li>
    <h3 id="add-proxy-to-windows-environment">Add proxy to windows environment</h3>
  </li>
</ul>

<div class="language-bash highlighter-rouge"><div class="highlight"><pre class="highlight"><code><span class="nb">set </span><span class="nv">http_proxy</span><span class="o">=</span><span class="s2">"http://&lt;user&gt;:&lt;password&gt;@&lt;ip&gt;:&lt;port&gt;"</span>
<span class="nb">set </span><span class="nv">https_proxy</span><span class="o">=</span><span class="s2">"http://&lt;user&gt;:&lt;password&gt;@&lt;ip&gt;:&lt;port&gt;"</span>
</code></pre></div></div>

<ul>
  <li>
    <h3 id="install-build-dependencies-for-webchimera">Install build dependencies for WebChimera</h3>
  </li>
</ul>

<p>Refer link : <a href="https://github.com/RSATom/WebChimera.js#windows">https://github.com/RSATom/WebChimera.js#windows</a></p>

<ol>
  <li>Visual Studio Community 2013/2015 - (I tried with VS2015)</li>
  <li>Install VLC Player 32 bit and add it to PATH environment variable (Used to build webchimera)</li>
  <li>CMake - cmake-3.6.0-rc2-win64-x64.msi</li>
  <li>Node.js</li>
  <li>Install <strong>NW.js ia32</strong> add it to PATH environment variable (Used to run player)</li>
</ol>

<ul>
  <li>
    <h3 id="add-proxy-to-npm-packaging-system">Add proxy to npm packaging system</h3>
  </li>
</ul>

<div class="language-bash highlighter-rouge"><div class="highlight"><pre class="highlight"><code>npm config <span class="nb">set </span>proxy http://&lt;user&gt;:&lt;password&gt;@&lt;ip&gt;:&lt;port&gt; 
npm config <span class="nb">set </span>https-proxy http://&lt;user&gt;:&lt;password&gt;@&lt;ip&gt;:&lt;port&gt;
</code></pre></div></div>

<p>Check npm configuration in <strong>C:\Users&lt;user&gt;.npmrc</strong></p>

<div class="language-bash highlighter-rouge"><div class="highlight"><pre class="highlight"><code>https-proxy<span class="o">=</span>http://&lt;user&gt;:&lt;password&gt;@43.88.64.10:8080/
<span class="nv">proxy</span><span class="o">=</span>http://&lt;user&gt;:&lt;password&gt;@43.88.64.10:8080/
</code></pre></div></div>

<ul>
  <li>
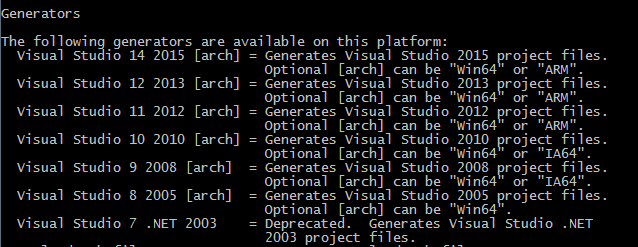
    <h3 id="check-cmake-generators">Check cmake generators</h3>
  </li>
</ul>

<div class="language-bash highlighter-rouge"><div class="highlight"><pre class="highlight"><code>cmake <span class="nt">--help</span>
</code></pre></div></div>

<p><img src="/images/Up-and-running-WebChimera-with-nwjs-win/cmake.png" alt="alt text" title="Up and running WebChimera with nwjs" /></p>

<ul>
  <li>
    <h3 id="clone-code-and-build-it">Clone code and build it</h3>
  </li>
</ul>

<div class="language-bash highlighter-rouge"><div class="highlight"><pre class="highlight"><code>git clone https://github.com/RSATom/wcjs-ugly-demo.git
<span class="nb">cd </span>wcjs-ugly-demo/
build_nwjs.cmd
</code></pre></div></div>

<ul>
  <li>
    <h3 id="run">Run</h3>
  </li>
</ul>

<div class="language-diff highlighter-rouge"><div class="highlight"><pre class="highlight"><code><span class="p">run_nwjs.cmd
</span></code></pre></div></div>

<p><img src="/images/Up-and-running-WebChimera-with-nwjs-win/nw-wcjs-win.png" alt="alt text" title="Up and running WebChimera with nwjs" /></p>]]></content><author><name></name></author><summary type="html"><![CDATA[Add proxy to windows environment]]></summary></entry><entry><title type="html">Up and running WebChimera with nwjs Ubuntu</title><link href="https://abhijeetk.github.io/Up-and-running-WebChimera-with-nwjs-ubuntu/" rel="alternate" type="text/html" title="Up and running WebChimera with nwjs Ubuntu" /><published>2016-11-11T00:00:00+05:30</published><updated>2016-11-11T00:00:00+05:30</updated><id>https://abhijeetk.github.io/Up-and-running-WebChimera-with-nwjs-ubuntu</id><content type="html" xml:base="https://abhijeetk.github.io/Up-and-running-WebChimera-with-nwjs-ubuntu/"><![CDATA[<ul>
  <li>
    <h3 id="add-proxy-to-bashrc">Add proxy to ~/.bashrc</h3>
  </li>
</ul>

<div class="language-bash highlighter-rouge"><div class="highlight"><pre class="highlight"><code><span class="nb">export </span><span class="nv">http_proxy</span><span class="o">=</span><span class="s2">"http://&lt;user&gt;:&lt;password&gt;@&lt;ip&gt;:&lt;port&gt;"</span>
<span class="nb">export </span><span class="nv">https_proxy</span><span class="o">=</span><span class="s2">"http://&lt;user&gt;:&lt;password&gt;@&lt;ip&gt;:&lt;port&gt;"</span>
</code></pre></div></div>

<ul>
  <li>
    <h3 id="add-proxy-to-packaging-system">Add proxy to packaging system</h3>
  </li>
</ul>

<p>If <strong>sudo apt-get update</strong> is not working, add below line to <strong><em>/etc/apt/apt.conf</em></strong>.</p>

<p>Create /etc/apt/apt.conf if it doesn’t exist and add line below</p>

<div class="language-bash highlighter-rouge"><div class="highlight"><pre class="highlight"><code>Acquire::http::Proxy <span class="s2">"http://&lt;user&gt;:&lt;password&gt;@43.88.64.10:8080"</span><span class="p">;</span>
</code></pre></div></div>

<div class="language-bash highlighter-rouge"><div class="highlight"><pre class="highlight"><code><span class="nb">sudo </span>gedit /etc/apt/apt.conf
</code></pre></div></div>

<ul>
  <li>
    <h3 id="install-buil-dependencies">Install buil dependencies</h3>
  </li>
</ul>

<div class="language-bash highlighter-rouge"><div class="highlight"><pre class="highlight"><code><span class="nb">sudo </span>apt-get update
<span class="nb">sudo </span>apt-get <span class="nb">install </span>build-essential cmake libvlc-dev
<span class="nb">sudo </span>apt-get <span class="nb">install </span>vlc
<span class="nb">sudo </span>apt-get <span class="nb">install </span>git
<span class="nb">sudo </span>apt-get <span class="nb">install </span>npm 
npm <span class="nt">-v</span>
npm config <span class="nb">set </span>proxy <span class="s2">"http://&lt;userid&gt;:&lt;passwd&gt;@43.88.64.10:8080"</span>
npm config <span class="nb">set </span>https-proxy <span class="s2">"http://&lt;userid&gt;:&lt;passwd&gt;@43.88.64.10:8080"</span>
<span class="nb">sudo </span>npm <span class="nb">install</span> <span class="nt">-g</span> npm@latest
npm <span class="nt">-v</span>
</code></pre></div></div>

<ul>
  <li>
    <h3 id="clone-code-and-build-it">Clone code and build it</h3>
  </li>
</ul>

<div class="language-bash highlighter-rouge"><div class="highlight"><pre class="highlight"><code><span class="nb">mkdir </span>work
<span class="nb">cd </span>work/
git clone https://github.com/RSATom/wcjs-ugly-demo.git
<span class="nb">cd </span>wcjs-ugly-demo/
./build_nwjs.sh 
</code></pre></div></div>

<ul>
  <li>
    <h3 id="run">Run</h3>
  </li>
</ul>

<div class="language-diff highlighter-rouge"><div class="highlight"><pre class="highlight"><code><span class="p">wget http://dl.nwjs.io/v0.12.0/nwjs-v0.12.0-linux-x64.tar.gz
tar -xvzf nwjs-v0.12.0-linux-x64.tar.gz 
export PATH=/home/abhijeet/work/wcjs-ugly-demo/nwjs-v0.12.0-linux-x64:"$PATH"
gedit index.html (Edit it to add http or https URL for video)
</span>./run_nwjs.sh
</code></pre></div></div>

<p><img src="/images/Up-and-running-WebChimera-with-nwjs-ubuntu/WebChimera.png" alt="alt text" title="Up and running WebChimera with nwjs Ubuntu" /></p>]]></content><author><name></name></author><summary type="html"><![CDATA[Add proxy to ~/.bashrc]]></summary></entry><entry><title type="html">Up and running webassembly in browser</title><link href="https://abhijeetk.github.io/Up-and-running-webassembly/" rel="alternate" type="text/html" title="Up and running webassembly in browser" /><published>2016-10-10T00:00:00+05:30</published><updated>2016-10-10T00:00:00+05:30</updated><id>https://abhijeetk.github.io/Up-and-running-webassembly</id><content type="html" xml:base="https://abhijeetk.github.io/Up-and-running-webassembly/"><![CDATA[<h2 id="asm-to-webassembly">ASM to WebAssembly</h2>

<ul>
  <li>
    <h3 id="prerequisite">Prerequisite</h3>
  </li>
</ul>

<ol>
  <li>Visual Studio 2015</li>
  <li>cmake</li>
</ol>

<ul>
  <li>
    <h3 id="clone-binaryentranscompiler-for-wasm">Clone binaryen(transcompiler for wasm)</h3>
  </li>
</ul>

<div class="language-bash highlighter-rouge"><div class="highlight"><pre class="highlight"><code><span class="nb">mkdir </span>wasmdemo
<span class="nb">cd </span>wasmdemo
git clone https://github.com/WebAssembly/binaryen.git
<span class="nb">cd </span>binaryen
</code></pre></div></div>

<ul>
  <li>
    <h3 id="build-code">Build code</h3>
  </li>
</ul>

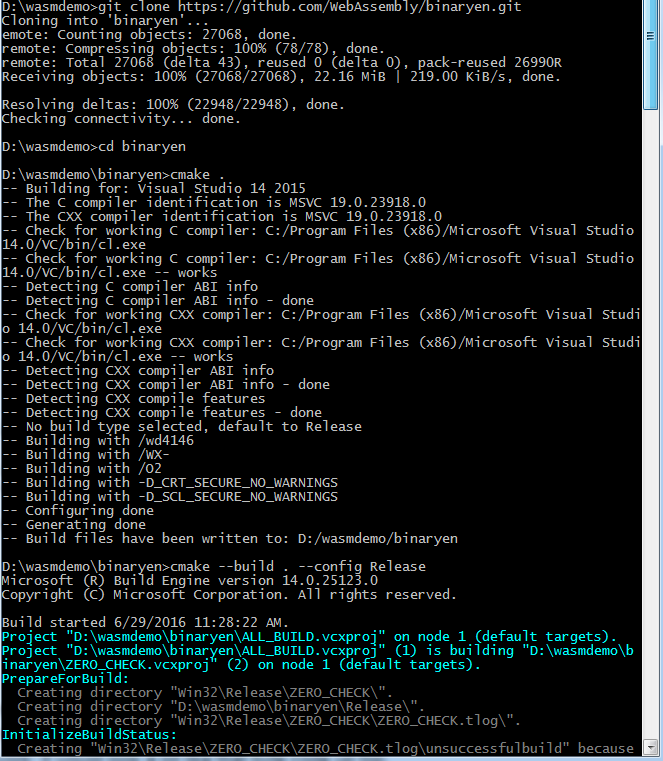
<div class="language-bash highlighter-rouge"><div class="highlight"><pre class="highlight"><code>wasmdemo<span class="se">\b</span>inaryen&gt;cmake <span class="nb">.</span>
wasmdemo<span class="se">\b</span>inaryen&gt;cmake <span class="nt">--build</span> <span class="nb">.</span> <span class="nt">--config</span> Release
</code></pre></div></div>

<p><img src="/images/Up-and-running-webassembly/binaryenBuild.png" alt="alt text" title="Up and running webassembly in browser" /></p>

<ul>
  <li>
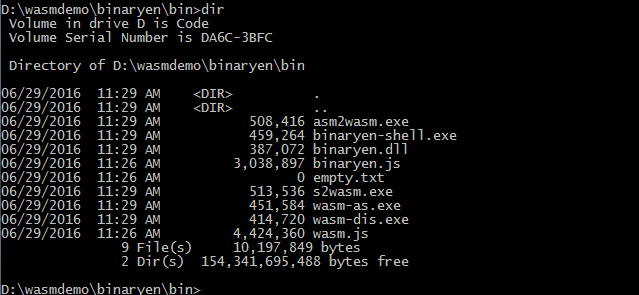
    <h3 id="utilities-gets-generated-after-build-in-binaryenbin">Utilities gets generated after build in binaryen/bin</h3>
  </li>
</ul>

<p><img src="/images/Up-and-running-webassembly/Utilities.png" alt="alt text" title="Up and running webassembly in browser" /></p>

<ul>
  <li>
    <h3 id="create-hello_worldasmjs-file-with-content-below">Create hello_world.asm.js file with content below</h3>
  </li>
</ul>

<div class="language-bash highlighter-rouge"><div class="highlight"><pre class="highlight"><code><span class="k">function </span>MyMathModule<span class="o">(</span>global<span class="o">)</span> <span class="o">{</span>
    <span class="s2">"use asm"</span><span class="p">;</span>
    var exp <span class="o">=</span> global.Math.exp<span class="p">;</span>
    <span class="k">function </span>doubleExp<span class="o">(</span>value<span class="o">)</span> <span class="o">{</span>
        value <span class="o">=</span> +value<span class="p">;</span>
        <span class="k">return</span> +<span class="o">(</span>+exp<span class="o">(</span>+value<span class="o">)</span> <span class="k">*</span> 2.0<span class="o">)</span><span class="p">;</span>
    <span class="o">}</span>
    <span class="k">return</span> <span class="o">{</span> doubleExp: doubleExp <span class="o">}</span><span class="p">;</span>
<span class="o">}</span>
</code></pre></div></div>

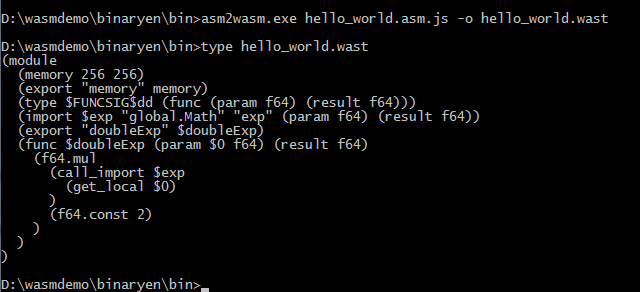
<p><img src="/images/Up-and-running-webassembly/asm2wasm.png" alt="alt text" title="Up and running webassembly in browser" /></p>

<ul>
  <li>
    <h3 id="wasm-asexe-is-a-wasm-assembler-which-converts-intermediate-ast-to-wasm-binary">wasm-as.exe is a wasm assembler which converts intermediate AST to wasm binary</h3>
  </li>
</ul>

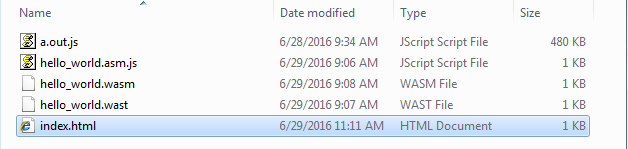
<div class="language-diff highlighter-rouge"><div class="highlight"><pre class="highlight"><code><span class="p">wasmdemo\binaryen\bin&gt;wasm-as.exe hello_world.wast -o hello_world.wasm
</span></code></pre></div></div>

<p><img src="/images/Up-and-running-webassembly/wasm-as.png" alt="alt text" title="Up and running webassembly in browser" /></p>

<h2 id="running-webassembly-in-browser">Running WebAssembly in Browser</h2>

<ul>
  <li>
    <p>We need to access WebAssembly on the Web is through an explicit JS API.
Refer <a href="https://github.com/WebAssembly/design/blob/master/JS.md">https://github.com/WebAssembly/design/blob/master/JS.md</a> for more information.</p>
  </li>
  <li>
    <p>Create file <em>index.html</em> with content below :</p>
  </li>
</ul>

<div class="language-bash highlighter-rouge"><div class="highlight"><pre class="highlight"><code>&lt;script&gt;
fetch<span class="o">(</span><span class="s2">"hello_world.wasm"</span><span class="o">)</span>
.then<span class="o">(</span><span class="k">function</span><span class="o">(</span>response<span class="o">)</span> <span class="o">{</span>
<span class="k">return </span>response.arrayBuffer<span class="o">()</span><span class="p">;</span>
<span class="o">})</span>
.then<span class="o">(</span><span class="k">function</span><span class="o">(</span>buffer<span class="o">)</span> <span class="o">{</span>
var dependencies <span class="o">=</span> <span class="o">{</span>
<span class="s2">"global"</span>: <span class="o">{}</span>,
<span class="s2">"env"</span>: <span class="o">{}</span>
<span class="o">}</span><span class="p">;</span>
dependencies[<span class="s2">"global.Math"</span><span class="o">]</span> <span class="o">=</span> window.Math<span class="p">;</span>
var moduleBufferView <span class="o">=</span> new Uint8Array<span class="o">(</span>buffer<span class="o">)</span><span class="p">;</span>
var myMathModule <span class="o">=</span> Wasm.instantiateModule<span class="o">(</span>moduleBufferView, dependencies<span class="o">)</span><span class="p">;</span>
console.log<span class="o">(</span>myMathModule.exports.doubleExp<span class="o">)</span><span class="p">;</span>
<span class="k">for</span><span class="o">(</span>var i <span class="o">=</span> 0<span class="p">;</span> i &lt; 5<span class="p">;</span> i++<span class="o">)</span> <span class="o">{</span>
console.log<span class="o">(</span>myMathModule.exports.doubleExp<span class="o">(</span>i<span class="o">))</span><span class="p">;</span>
<span class="o">}</span>
<span class="o">})</span><span class="p">;</span>
&lt;/script&gt;
</code></pre></div></div>

<p><img src="/images/Up-and-running-webassembly/server_content.png" alt="alt text" title="Up and running webassembly in browser" /></p>

<ul>
  <li>Run code through local server and open file in <strong>Chrome Canary</strong> web browser.</li>
</ul>

<p><em>Other browsers might give an error as binaryen version used to build wasm file and binaryen version inside browser is different.</em></p>

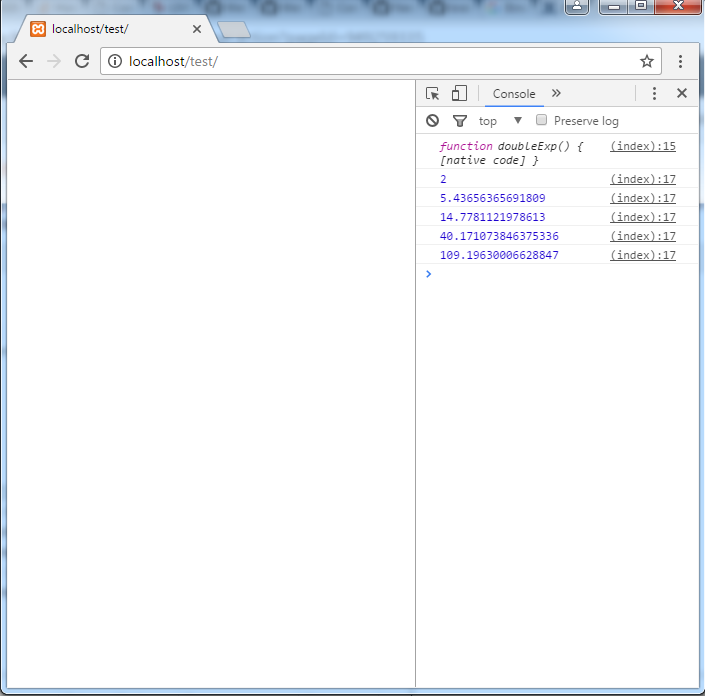
<div class="language-bash highlighter-rouge"><div class="highlight"><pre class="highlight"><code>TypeError: wasm validation error at offset 8: failed to match binary version
</code></pre></div></div>

<ul>
  <li>
    <h3 id="output">Output</h3>
  </li>
</ul>

<p><img src="/images/Up-and-running-webassembly/output.png" alt="alt text" title="Up and running webassembly in browser" /></p>

<ul>
  <li>
    <h3 id="references">References</h3>
  </li>
</ul>

<p><a href="http://cultureofdevelopment.com/blog/build-your-first-thing-with-web-assembly/">http://cultureofdevelopment.com/blog/build-your-first-thing-with-web-assembly/</a>
<a href="https://github.com/WebAssembly/design/blob/master/JS.md">https://github.com/WebAssembly/design/blob/master/JS.md</a>
<a href="https://github.com/brakmic/brakmic/blob/master/webassembly/COMPILING_WIN32.md">https://github.com/brakmic/brakmic/blob/master/webassembly/COMPILING_WIN32.md</a></p>]]></content><author><name></name></author><summary type="html"><![CDATA[ASM to WebAssembly]]></summary></entry><entry><title type="html">Up and running ASM.js in browser</title><link href="https://abhijeetk.github.io/Up-and-running-ASMjs/" rel="alternate" type="text/html" title="Up and running ASM.js in browser" /><published>2016-07-10T00:00:00+05:30</published><updated>2016-07-10T00:00:00+05:30</updated><id>https://abhijeetk.github.io/Up-and-running-ASMjs</id><content type="html" xml:base="https://abhijeetk.github.io/Up-and-running-ASMjs/"><![CDATA[<ul>
  <li>
    <h3 id="install-emscripten-sdk">Install Emscripten SDK</h3>
    <p>Download Emscripten SDK Offline Installer and install it. For more information about installation process refer <a href="https://kripken.github.io/emscripten-site/docs/getting_started/index.html">https://kripken.github.io/emscripten-site/docs/getting_started/index.html</a></p>
  </li>
  <li>
    <h3 id="check-emscripten-installation">Check Emscripten installation</h3>
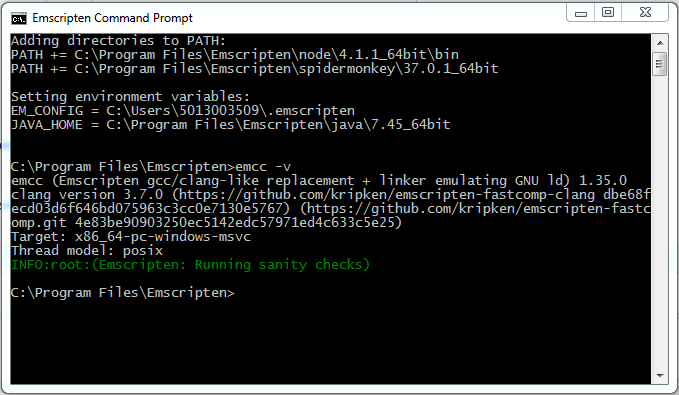
    <p>Click on <em>Windows -&gt; Search</em> and search for Emscripten Command Prompt. Check Emscripten version.</p>
  </li>
</ul>

<div class="language-bash highlighter-rouge"><div class="highlight"><pre class="highlight"><code>emcc <span class="nt">-v</span>
</code></pre></div></div>

<p><strong>emcc is transcompiler to compile C/C++ code to javascript code.</strong></p>

<p><img src="/images/Up-and-running-ASM-js/emcc_version.png" alt="alt text" title="Up and running ASM.js in browser" /></p>

<ul>
  <li>
    <h3 id="create-cc-test-file">Create C/C++ test file</h3>
  </li>
</ul>

<div class="language-bash highlighter-rouge"><div class="highlight"><pre class="highlight"><code><span class="nb">mkdir </span>asmdemo
<span class="nb">cd </span>asmdemo
copy NUL hello-world.c <span class="o">(</span>create hello-world.c<span class="o">)</span>
</code></pre></div></div>

<p>Copy following content into newly created hello-world.c</p>

<div class="language-bash highlighter-rouge"><div class="highlight"><pre class="highlight"><code><span class="c">#include&lt;stdio.h&gt;</span>
int main<span class="o">()</span> <span class="o">{</span>
  <span class="nb">printf</span><span class="o">(</span><span class="s2">"hello, world!</span><span class="se">\n</span><span class="s2">"</span><span class="o">)</span><span class="p">;</span>
  <span class="k">return </span>0<span class="p">;</span>
<span class="o">}</span>
</code></pre></div></div>

<ul>
  <li>
    <h3 id="compile-cc-code-using-emcc">Compile C/C++ code using emcc</h3>
  </li>
</ul>

<div class="language-bash highlighter-rouge"><div class="highlight"><pre class="highlight"><code>emcc hello-world.c
</code></pre></div></div>

<p>it will create file name a.out.js</p>

<ul>
  <li>
    <h3 id="run">Run</h3>
  </li>
</ul>

<div class="language-bash highlighter-rouge"><div class="highlight"><pre class="highlight"><code>node a.out.js
</code></pre></div></div>

<p><img src="/images/Up-and-running-ASM-js/compile-n-run.png" alt="alt text" title="Up and running ASM.js in browser" /></p>

<ul>
  <li>
    <h3 id="asmjs-in-browser">ASM.js in Browser</h3>
  </li>
  <li>We want HTML so that we can view it in the browser. Enter this command to specify and HTML document.</li>
</ul>

<div class="language-bash highlighter-rouge"><div class="highlight"><pre class="highlight"><code>emcc hello-world.c <span class="nt">-o</span> hello.html
</code></pre></div></div>

<ul>
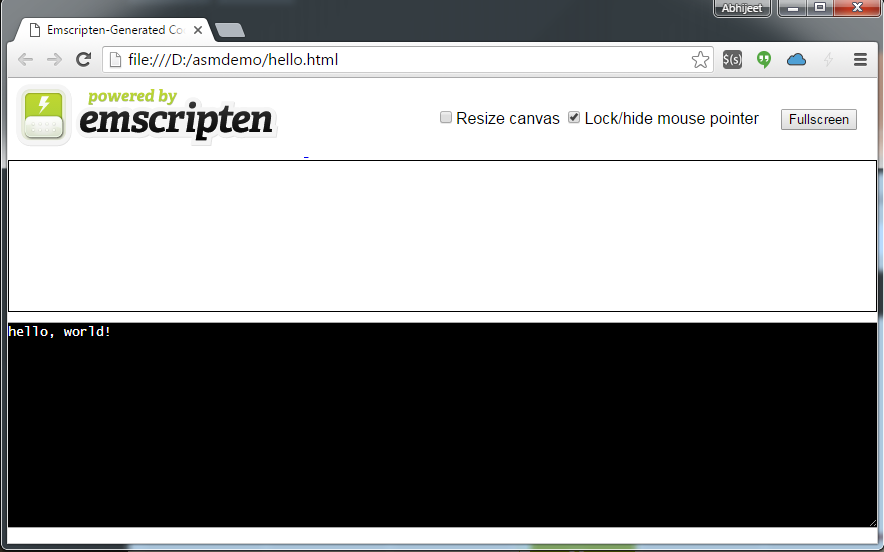
  <li>Open hello.html that with your browser, and you can see it as a web page.</li>
</ul>

<p><img src="/images/Up-and-running-ASM-js/emcc-in-browser.png" alt="alt text" title="Up and running ASM.js in browser" /></p>]]></content><author><name></name></author><summary type="html"><![CDATA[Install Emscripten SDK Download Emscripten SDK Offline Installer and install it. For more information about installation process refer https://kripken.github.io/emscripten-site/docs/getting_started/index.html]]></summary></entry><entry><title type="html">Building ffmpeg form nwjs/chromium repository</title><link href="https://abhijeetk.github.io/Building-ffmpeg-form-nwjs-or-chromium-repository/" rel="alternate" type="text/html" title="Building ffmpeg form nwjs/chromium repository" /><published>2016-02-28T00:00:00+05:30</published><updated>2016-02-28T00:00:00+05:30</updated><id>https://abhijeetk.github.io/Building-ffmpeg-form-nwjs-or-chromium-repository</id><content type="html" xml:base="https://abhijeetk.github.io/Building-ffmpeg-form-nwjs-or-chromium-repository/"><![CDATA[<ul>
  <li>
    <p>Open VS2013 x64 Native Tools Command Prompt
C:\Program Files (x86)\Microsoft Visual Studio 12.0\Common7\Tools\Shortcuts</p>
  </li>
  <li>
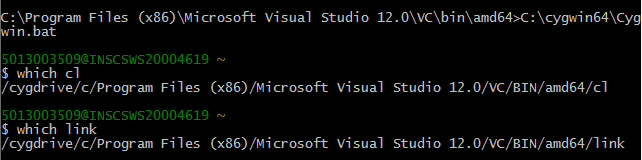
    <p>Open C:\cygwin64\Cygwin.bat in VS2013 x64 Native Tools Command Prompt and make sure that compiler and linker are refering to VS2013 64 bit executables as shown below.[Assuming you have cygwin installed on your Windows machine]</p>
  </li>
</ul>

<p><img src="/images/Building-ffmpeg-form-nwjs-or-chromium-repository/image001.png" alt="alt text" title="Building ffmpeg form nwjs/chromium repository" /></p>

<ul>
  <li>Set following environment variables</li>
</ul>

<div class="language-bash highlighter-rouge"><div class="highlight"><pre class="highlight"><code>    <span class="nb">set </span><span class="nv">GYP_DEFINES</span><span class="o">=</span><span class="nv">host_arch</span><span class="o">=</span>x64 <span class="nv">target_arch</span><span class="o">=</span>x64 <span class="nv">nwjs_sdk</span><span class="o">=</span>1 <span class="nv">disable_nacl</span><span class="o">=</span>0 <span class="nv">proprietary_codecs</span><span class="o">=</span>1 <span class="nv">branding</span><span class="o">=</span>Chrome
</code></pre></div></div>

<p><img src="/images/Building-ffmpeg-form-nwjs-or-chromium-repository/image002.png" alt="alt text" title="Building ffmpeg form nwjs/chromium repository" /></p>

<ul>
  <li>Go to Ffmpeg source code location :</li>
</ul>

<div class="language-bash highlighter-rouge"><div class="highlight"><pre class="highlight"><code>    &lt;node-webkit-dir&gt;<span class="se">\s</span>rc<span class="se">\t</span>hird_party<span class="se">\f</span>fmpeg
</code></pre></div></div>

<ul>
  <li><strong>[APPLY PATCH to file ]</strong> <ffmpeg_src>/chromium/scripts/build_ffmpeg.py</ffmpeg_src></li>
</ul>

<p>Add support of mxf by enabling it as decoder, demuxer and parser</p>

<div class="language-diff highlighter-rouge"><div class="highlight"><pre class="highlight"><code><span class="gd">-      '--enable-decoder=pcm_s16be,pcm_s24be,pcm_mulaw,pcm_alaw',
-      '--enable-demuxer=ogg,matroska,wav',
-      '--enable-parser=opus,vp3,vorbis,vp8',
</span><span class="err">
</span><span class="gi">+      '--enable-decoder=pcm_s16be,pcm_s24be,pcm_mulaw,pcm_alaw,mxf',
+      '--enable-demuxer=ogg,matroska,wav,mxf',
+      '--enable-parser=opus,vp3,vorbis,vp8,mxf',
</span></code></pre></div></div>

<ul>
  <li><strong>[APPLY PATCH to file ]</strong> : <ffmpeg_src>/chromium/scripts/build_ffmpeg.py</ffmpeg_src></li>
</ul>

<p>Add support of mxf by enabling it as decoder, demuxer and parser</p>

<div class="language-diff highlighter-rouge"><div class="highlight"><pre class="highlight"><code>       ['chromeos == 1', {
         'ffmpeg_branding%': '&lt;(branding)OS',
       }, {  # otherwise, assume Chrome/Chromium.
<span class="gd">-        'ffmpeg_branding%': '&lt;(branding)',
</span><span class="gi">+         'ffmpeg_branding%': 'Chrome',
</span>       }],
     ],
</code></pre></div></div>

<ul>
  <li>Build standalone ffmpeg code for windows 64 bit.</li>
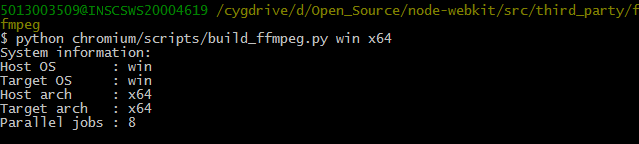
</ul>

<p><img src="/images/Building-ffmpeg-form-nwjs-or-chromium-repository/image003.png" alt="alt text" title="Building ffmpeg form nwjs/chromium repository" /></p>

<ul>
  <li>
    <p>Build will generate following directory <strong>build.x64.win</strong><ffmpeg_src> folder.</ffmpeg_src></p>
  </li>
  <li>
    <p>Copy config and from <strong>build.x64.win</strong>:</p>
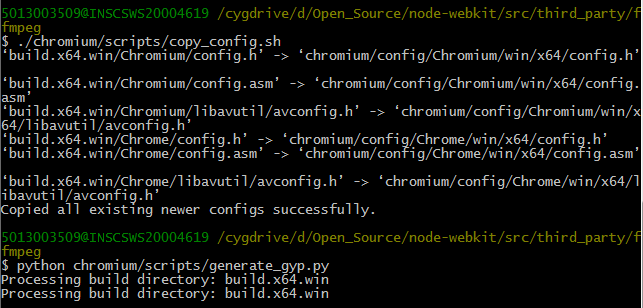
  </li>
</ul>

<div class="language-bash highlighter-rouge"><div class="highlight"><pre class="highlight"><code>ffmpeg_src&gt;./chromium/scripts/copy_config.sh
</code></pre></div></div>

<p>Regenerate ffmpeg gyp files :</p>

<div class="language-bash highlighter-rouge"><div class="highlight"><pre class="highlight"><code>ffmpeg_src&gt;python chromium/scripts/generate_gyp.py
</code></pre></div></div>

<p><img src="/images/Building-ffmpeg-form-nwjs-or-chromium-repository/image004.png" alt="alt text" title="Building ffmpeg form nwjs/chromium repository" /></p>

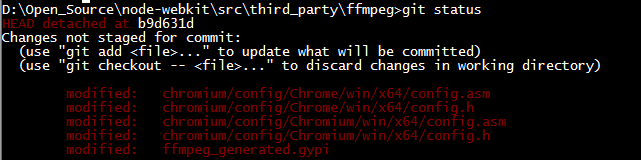
<p>Following files get modified after running above commands:</p>

<p><img src="/images/Building-ffmpeg-form-nwjs-or-chromium-repository/image005.png" alt="alt text" title="Building ffmpeg form nwjs/chromium repository" /></p>

<ul>
  <li><strong>Force nwjs(chromium) to regenerate ninja files</strong> for modified  *.h, *.asm, *.gypi (see previous step): 
Go to nwjs source code location :  /node-webkit/src</li>
</ul>

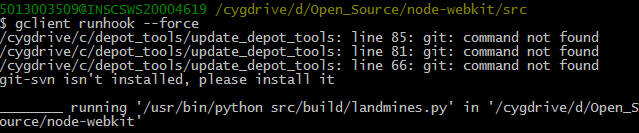
<div class="language-bash highlighter-rouge"><div class="highlight"><pre class="highlight"><code>src&gt;gclientrunhook–force
</code></pre></div></div>

<p><img src="/images/Building-ffmpeg-form-nwjs-or-chromium-repository/image006.png" alt="alt text" title="Building ffmpeg form nwjs/chromium repository" /></p>

<ul>
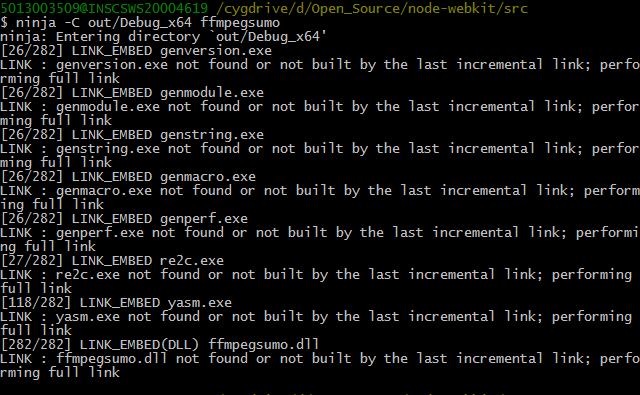
  <li>Build ffmpeg code using ninja to generate ffmpegsumo.dll:</li>
</ul>

<div class="language-bash highlighter-rouge"><div class="highlight"><pre class="highlight"><code>src&gt;ninja <span class="nt">-C</span> out/Debug_x64 ffmpegsumo-j16
</code></pre></div></div>

<p><img src="/images/Building-ffmpeg-form-nwjs-or-chromium-repository/image007.png" alt="alt text" title="Building ffmpeg form nwjs/chromium repository" /></p>

<ul>
  <li>Build nwjs code using ninja and link to ffmpegsumo.dll:</li>
</ul>

<div class="language-bash highlighter-rouge"><div class="highlight"><pre class="highlight"><code>src&gt;ninja <span class="nt">-C</span> out/Debug_x64 nw <span class="nt">-j16</span>
</code></pre></div></div>

<p><img src="/images/Building-ffmpeg-form-nwjs-or-chromium-repository/image008.png" alt="alt text" title="Building ffmpeg form nwjs/chromium repository" /></p>]]></content><author><name></name></author><summary type="html"><![CDATA[Open VS2013 x64 Native Tools Command Prompt C:\Program Files (x86)\Microsoft Visual Studio 12.0\Common7\Tools\Shortcuts Open C:\cygwin64\Cygwin.bat in VS2013 x64 Native Tools Command Prompt and make sure that compiler and linker are refering to VS2013 64 bit executables as shown below.[Assuming you have cygwin installed on your Windows machine] Set following environment variables set GYP_DEFINES=host_arch=x64 target_arch=x64 nwjs_sdk=1 disable_nacl=0 proprietary_codecs=1 branding=Chrome Go to Ffmpeg source code location : &lt;node-webkit-dir&gt;\src\third_party\ffmpeg [APPLY PATCH to file ] /chromium/scripts/build_ffmpeg.py Add support of mxf by enabling it as decoder, demuxer and parser - '--enable-decoder=pcm_s16be,pcm_s24be,pcm_mulaw,pcm_alaw', - '--enable-demuxer=ogg,matroska,wav', - '--enable-parser=opus,vp3,vorbis,vp8', + '--enable-decoder=pcm_s16be,pcm_s24be,pcm_mulaw,pcm_alaw,mxf', + '--enable-demuxer=ogg,matroska,wav,mxf', + '--enable-parser=opus,vp3,vorbis,vp8,mxf', [APPLY PATCH to file ] : /chromium/scripts/build_ffmpeg.py Add support of mxf by enabling it as decoder, demuxer and parser ['chromeos == 1', { 'ffmpeg_branding%': '&lt;(branding)OS', }, { # otherwise, assume Chrome/Chromium. - 'ffmpeg_branding%': '&lt;(branding)', + 'ffmpeg_branding%': 'Chrome', }], ], Build standalone ffmpeg code for windows 64 bit. Build will generate following directory build.x64.win folder. Copy config and from build.x64.win: ffmpeg_src&gt;./chromium/scripts/copy_config.sh Regenerate ffmpeg gyp files : ffmpeg_src&gt;python chromium/scripts/generate_gyp.py Following files get modified after running above commands: Force nwjs(chromium) to regenerate ninja files for modified *.h, *.asm, *.gypi (see previous step): Go to nwjs source code location : /node-webkit/src src&gt;gclientrunhook–force Build ffmpeg code using ninja to generate ffmpegsumo.dll: src&gt;ninja -C out/Debug_x64 ffmpegsumo-j16 Build nwjs code using ninja and link to ffmpegsumo.dll: src&gt;ninja -C out/Debug_x64 nw -j16]]></summary></entry><entry><title type="html">Building ffmpeg and ffplay on Windows7 64 bit</title><link href="https://abhijeetk.github.io/Building-ffmpeg-and-ffplay-on-Windows7-64-bit/" rel="alternate" type="text/html" title="Building ffmpeg and ffplay on Windows7 64 bit" /><published>2016-02-07T00:00:00+05:30</published><updated>2016-02-07T00:00:00+05:30</updated><id>https://abhijeetk.github.io/Building%20ffmpeg%20and%20ffplay%20on%20Windows7%2064%20bit</id><content type="html" xml:base="https://abhijeetk.github.io/Building-ffmpeg-and-ffplay-on-Windows7-64-bit/"><![CDATA[<p>##Prerequisite for ffmpeg##</p>
<ul>
  <li>
    <p>Install Msys64 on yourmachine. (msys2-x86_64-20150916.exe)</p>
  </li>
  <li>
    <p>Open VS2013 x64 Native Tools Command Prompt
C:\Program Files (x86)\Microsoft Visual Studio 12.0\Common7\Tools\Shortcuts</p>
  </li>
  <li>
    <p>Run C:/msys64/mingw64_shell.bat in VS2013 x64 Native Tools Command Prompt</p>
  </li>
  <li>
    <p>Check current compiler : It should be pointing to VS2013 compiler</p>
  </li>
  <li>
    <p>Check current linker, if it is referring to /usr/bin/link then we have to change it by renaming link.exe. Rename C:\msys64\usr\bin\link.exe to C:\msys64\usr\bin \link_old.exe</p>
  </li>
  <li>YASM : Download YASM from http://www.tortall.net/projects/yasm/releases/yasm-1.3.0-win64.exe
    <ul>
      <li>Rename yasm-1.3.0-win64.exe to yasm.exe</li>
      <li>Place yasm.exe somewhere in your PATH environment variable or Add it to C:\Program Files (x86)\Microsoft Visual Studio 12.0\VC\bin</li>
    </ul>
  </li>
  <li>Make sure to use mingw64_shell.bat to have the correct MinGW-w64 environment. Run following commands in MinGW-w64 to install dependencies.</li>
</ul>

<div class="language-bash highlighter-rouge"><div class="highlight"><pre class="highlight"><code>    <span class="c">#normal msys2 packages</span>
    pacman <span class="nt">-S</span> make pkgconfdiffutils
    <span class="c"># mingw-w64 packages and toolchains</span>
    pacman <span class="nt">-S</span> mingw-w64-x86_64-yasm mingw-w64-x86_64-gcc mingw-w64-x86_64-SDL
</code></pre></div></div>

<p>##Download ffmpeg code##</p>

<div class="language-bash highlighter-rouge"><div class="highlight"><pre class="highlight"><code>    <span class="nb">mkdir </span>ffmpeg
    <span class="nb">cd </span>ffmpeg
    git clone https://github.com/FFmpeg/FFmpeg.git
</code></pre></div></div>

<p>##Build instructions for ffmpeg## 
Ffmpeg can be built directly using following commands. If you wish to compile shared libraries, add –enable-shared to your configure options.</p>

<div class="language-bash highlighter-rouge"><div class="highlight"><pre class="highlight"><code>    ./configure <span class="nt">--toolchain</span><span class="o">=</span>msvc
    make
    make <span class="nb">install</span>
</code></pre></div></div>

<p>##Build instructions for ffplay##</p>

<ul>
  <li>Download SDL from http://www.libsdl.org/release/SDL-devel-1.2.15-VC.zip</li>
  <li>Extract it and copy
    <ul>
      <li>SDL-devel-1.2.15-VC\SDL-1.2.15\include*.*  to C:\msys64\mingw64\include\SDL
        <ul>
          <li>Click -&gt; Copy and Replace</li>
        </ul>
      </li>
      <li>SDL-devel-1.2.15-VC\SDL-1.2.15\lib\x64 to
C:\msys64\mingw64\lib</li>
    </ul>
  </li>
  <li>Open file C:\msys64\mingw64\bin\sdl-config and modify following lines</li>
</ul>

<div class="language-bash highlighter-rouge"><div class="highlight"><pre class="highlight"><code>        <span class="nt">--libs</span><span class="o">)</span>
  <span class="nb">echo</span> <span class="nt">-L</span><span class="k">${</span><span class="nv">exec_prefix</span><span class="k">}</span>/lib <span class="nt">-lSDLmain</span> <span class="nt">-lSDL</span>
        <span class="p">;;</span>
      <span class="nt">--static-libs</span><span class="o">)</span>
  <span class="c">#    --libs|--static-libs)</span>
  <span class="nb">echo</span> <span class="nt">-L</span><span class="k">${</span><span class="nv">exec_prefix</span><span class="k">}</span>/lib <span class="nt">-lSDLmain</span> <span class="nt">-lSDL</span>
        <span class="p">;;</span>
</code></pre></div></div>

<ul>
  <li>Run following commands :</li>
</ul>

<div class="language-bash highlighter-rouge"><div class="highlight"><pre class="highlight"><code>./configure <span class="nt">--enable-ffplay</span> <span class="nt">--toolchain</span><span class="o">=</span>msvc <span class="nt">--disable-shared</span> <span class="nt">--enable-static</span> <span class="nt">--enable-sdl</span> <span class="nt">--extra-ldflags</span><span class="o">=</span><span class="s2">"-Wl,-add-stdcall-alias"</span> <span class="nt">--enable-memalign-hack</span> <span class="nt">--disable-ffmpeg</span> <span class="nt">--pkg-config</span><span class="o">=</span>sdl-config
</code></pre></div></div>]]></content><author><name></name></author><summary type="html"><![CDATA[##Prerequisite for ffmpeg## Install Msys64 on yourmachine. (msys2-x86_64-20150916.exe)]]></summary></entry></feed>